A little update. I got some time tonight to work on the car.
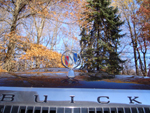
First thing I had to do was charge the battery because I left the cargo light on in the back for a few weeks. I started removing the woodgrain trim off the front fenders. I also removed the smashed grill to straighten the part of the hood where it mounts.
It was a bit sunny this afternoon and the woodgrain felt warm.. so the peeling commenced.
Up on the lift she went and I pulled out the defunct ac compressor. I'll install a new compressor in the near future. While it was on the battery charger in the shop I got out the heat gun and went to town on the front of the car.
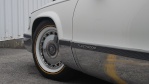
Propped the wheel up against the car to give me an idea of what it's gonna look like. Ignore the RM wheel spokes behind it.
I've gotta get the corroded screws out of the rim to take the center caps off for balancing then I'll mount them.
After I repair the brake line I'll take it for a ride go get some 93 octane to run through it and see what other issues it has driving down the road.
Lowering springs are on the way as well....
92cappy
Posts : 332 Join date : 2011-09-29 Location : Silver Spring MD
Cool. I'm assuming it's going to be painted? what color are you thinking of? Those rims look kinda cool with the RM wheel spokes behind it.
It's not going to be painted. This is a very low budget project. The budget is $500 including the cost of the car to get it running, looking decent and registered/inspected.
92cappy
Posts : 332 Join date : 2011-09-29 Location : Silver Spring MD
I will get some spray paint that closely matches and paint around the door handles and gas door. The trim will probably go back on. I've not decided yet what to do with it before it goes back. The car is just going to be a beater so I'm not going too crazy with it. Cheap and simple.
92cappy
Posts : 332 Join date : 2011-09-29 Location : Silver Spring MD
Purchased an A/C bypass pulley to use for the time being, until I can get my hands on my NIB compressor.
What a POS this thing is. I got it from Advanced Auto. I had to drill the holes larger because the shank on the factory bolts wouldn't fit. After that, I had to use washers behind it because it didn't line up properly. Extremely loud A/C compressor noise delete.
I dumped in some fresh gas and let it run a little bit. No more check engine light on. Woohoo! But, I did notice the voltage light on. After starting the car a few times I noticed the battery getting weak. Bum alternator. Thank you Autozone and your lifetime warranty. Freebie!
Since this is a budget build.. er... revival (not really a build I'm just bringing an old car back to life), I've changed the topic name and added a running total to the first post. Check back soon for more updates..
Lynol
Posts : 768 Join date : 2010-06-29 Age : 40 Location : Central New Jersey
Damn, Tim, I knew I should have made a post on how much those bypass pulleys SUCKED to warn everyone, but I never did. I went through 3 of them on my red Caprice. First one lasted 100 miles before squealing, then the next one was a squaller out of the box, then the one after that was OK... at least for the 30 miles or so I drove it before selling the car. NEVER. AGAIN. Dorman AC bypass pulleys are total crap. Supposedly there is a more expensive GM one that does NOT suck. You may want to look into that if you're not planning on fixing the AC.
Thanks but I don't want to wait for shipping I need to road test the car. This is only temporary. I have a brand new in box AC compressor I just don't have it with me.
sherlock9c1
Posts : 2373 Join date : 2009-05-28 Location : Huntsville, AL
Subject: Re: 94 Roadmaster - $500 budget revival Sat Apr 28, 2012 8:55 am
Don't bother with high-octane gas - buy a bottle of Chevron fuel system cleaner instead.
Gastt
Posts : 525 Join date : 2010-07-30 Age : 36 Location : Treasure Coast, FL
Subject: Re: 94 Roadmaster - $500 budget revival Sat Apr 28, 2012 9:32 am
Thanks for the tip, I'll try that out.
phantom 309
Posts : 5848 Join date : 2008-12-28 Age : 114
Subject: Re: 94 Roadmaster - $500 budget revival Sat Apr 28, 2012 10:17 am
methyl hydrate from the hardware store,.
Nick
sherlock9c1
Posts : 2373 Join date : 2009-05-28 Location : Huntsville, AL
Replaced the rear axle brake lines. Everything came off easy despite the rust. I don't know how you guys do this crap without a lift... bless you lol
Unfortunately, I still don't have rear brakes. I only got fluid to come out of the passenger side. I think the rear brakes are seized. Maybe the cylinders... I'll pull the drums off and check it out.
Gastt
Posts : 525 Join date : 2010-07-30 Age : 36 Location : Treasure Coast, FL
The radiator support was bent and rusted. The makeshift headlight held lots of moisture and completely rotted the body mount and most of the passenger side of the support. I was donated a solid core support and so I am replacing this one.
I didn't lose a drop of fluid but I will be painting the new one so to avoid scratches and or damage to anything else I may remove at least the radiator. But probably not.
mtrhead79
Posts : 1599 Join date : 2010-04-24 Age : 55 Location : phila. pa
The driver side is all there. The passenger side is gone under the battery. There is enough metal there to be able to stuff in a plastic battery tray. I might weld in a piece of sheet metal.
jimbeau
Posts : 1181 Join date : 2010-06-25 Location : Detroit
Subject: Re: 94 Roadmaster - $500 budget revival Fri May 11, 2012 2:13 am
sherlock9c1 wrote:
Don't bother with high-octane gas - buy a bottle of Chevron fuel system cleaner instead.
phantom 309 wrote:
methyl hydrate from the hardware store,. Nick
sherlock9c1 wrote:
Or Toluene...
This warrants some explanation. What quantities of each of these three items would be necessary to bring a tankful of 87 up to 93?
brokecello Moderator
Posts : 3478 Join date : 2009-05-28 Age : 45 Location : Greenville, SC
Dang that Rad support was rough! Bet it will feel good to get that new one in! If you do an inner fender..plan on buying all new retainer clips and bolts. They will all likely bust.
Chris
mtrhead79
Posts : 1599 Join date : 2010-04-24 Age : 55 Location : phila. pa
the clips that go on fender that the wheelwell bolts into are available at auto zone in there rotateing racks that have clips and bolts. i found that out after i went to jy and found some then sand blasted and painted mine. what a waste of time when i could have bought them new and been done
Gastt
Posts : 525 Join date : 2010-07-30 Age : 36 Location : Treasure Coast, FL
Subject: Re: 94 Roadmaster - $500 budget revival Sat May 12, 2012 8:30 am
Thanks for the tips guys. I had another project going on the past few days. I hope to get the replacement painted this weekend and installed on Monday.
Gastt
Posts : 525 Join date : 2010-07-30 Age : 36 Location : Treasure Coast, FL
Subject: Re: 94 Roadmaster - $500 budget revival Fri Oct 26, 2012 10:33 am
Its been about 5 months since I touched the Buick. Reading some forums gave me motivation to do something. I wanted to finish bolting in the radiator support. I threw the battery in and she fired right up! I gave the accellerator a few pumps, she runs so smooth... Sitting in the drivers seat ready to drive into the garage, I grab the shift lever. But, I heard a strange sound coming from up front. I go look, Trans fluid shooting all over the radiator. While trying to force the new radiator suport in I must have cracked the Trans cooler line.
Did a quick fix for now to move it around the yard.
These were just sitting in the garage at home so I figured id put them to better use.
Finally got the radiator support bolted in. Air dams and plastic inner fenders bolted in. Fixed the headlight wiring and got the headlights in it. Went to put the chevy grill on and I seem to have lost the screws. I can't wait to drive this POS. Hopefully going tomorrow to get the transmission for it. Just need to do the rear brakes and it's going on the road.
The radiator is still too high on the drivers side and I don't understand why but I don't really care. It works.
Heres a pic of my quick fix. The hose is much longer than the gap in the pipe. The gap is probably 1/4". The clamps are super tight. It will work until I can find a replacement pipe.
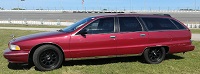
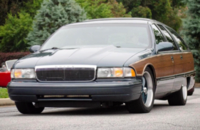
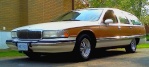
Next to the Fleetwood
MarkH
Posts : 455 Join date : 2011-08-24 Age : 43 Location : Valparaiso, IN
Subject: Re: 94 Roadmaster - $500 budget revival Fri Oct 26, 2012 11:02 am
I really like your tire and wheel combo.... looks slick
Gastt
Posts : 525 Join date : 2010-07-30 Age : 36 Location : Treasure Coast, FL
Subject: Re: 94 Roadmaster - $500 budget revival Fri Oct 26, 2012 11:05 am
BTW guys, I did buy lowering springs for this wagon. But, they ended up in the Fleetwood. I figured since the wagon is going to be my winter car it wouldn't make sense having it on the ground.
Mods can move this to project section.
brokecello Moderator
Posts : 3478 Join date : 2009-05-28 Age : 45 Location : Greenville, SC
Subject: Re: 94 Roadmaster - $500 budget revival Sun Oct 28, 2012 10:07 pm
Check those two lower rubber radiator mounts...if you put them in backwards the rad wont sit right (too high)
Love those wheels and tires!
Gastt
Posts : 525 Join date : 2010-07-30 Age : 36 Location : Treasure Coast, FL
Subject: Re: 94 Roadmaster - $500 budget revival Sun Oct 28, 2012 10:52 pm
Thanks! They are chrome Brougham wheels and vogue tires. I'll check the mounts but I'm pretty sure I put them in right. I think the rad support is out of whack.
It's only higher on the drivers side.
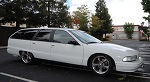
It's starting to look "whole". It really needs a Buick grill but, I'm using what I have til I find a cheap RMW grill.
I might pull off that outer fender and try to straighten it a little. But honestly, I couldn't care much less.
The headlights need some adjusting but its coming together.
Gastt
Posts : 525 Join date : 2010-07-30 Age : 36 Location : Treasure Coast, FL
Subject: Re: 94 Roadmaster - $500 budget revival Sun Nov 11, 2012 10:06 pm
and so it began trans R+R (2 weeks ago)
Someone had already cut the drivers side cat pipe. I'll have to weld it back.
1994 4l60e trans connector. On the right side of the connector you can see there is only 1 pin.
1995 4l60e trans connector. On the right side of the connector you can see there are 2 pins. The second pin is pin "U". This pin recieves the signal from a 1995 PCM (pin D6, blue connector) for the Pulse Width Modulation solenoid.
Engine harness connector for 4l60e. You can see there are open spots to add pins.
I have a '95 computer already. It is from a Roadmaster sedan with the correct rear gears and correct transmission tune to provide a proper signal for the PWM function on the 95 trans. (rear gear program has nothing to do with PWM but it will keep my speedo accurate)
Swap is done. I just need to get the dipstick in position, fill trans, add the pins and extra wire, swap the PCM and button up the exhaust.
Gastt
Posts : 525 Join date : 2010-07-30 Age : 36 Location : Treasure Coast, FL
Subject: Re: 94 Roadmaster - $500 budget revival Sat Jan 19, 2013 9:16 pm
Update...
Transmission works very good, but I still have not added the wire for the PWM. I only use the car around town so I've been driving it in "3" so I don't jeopardize the transmission until I find time to run the wire.
I pulled off the rear drums ready to replace everything since I couldn't get fluid out of the drivers cylinder when I was met with a nice surprise. Everything was already very new. So I continued to bleed the brakes. Pop, the brake line that goes from the front to the rear blew. So that was replaced from where it comes down the frame to the flex hose on the rear end. Finally got all the air out. After driving it around the front pads started squealing and squeeking with and without the pedal applied. The rattle clips were rotted and the pad material was cracked. Today I put on new ceramic pads and grabbed a caliper kit with new clips and rubber bushings. Brakes are silent now. Paid $25 for the pads and probably $10 for the lines.
Rear junction
Passenger side
Driver side
Bubble flare connection in the front.
The drivers outer tie rod was completely shot. So bad that when I hit the brake it dove for the curb... Or oncoming traffic. Replaced that today with a cheapie. $10. Maybe down the line ill do the whole steering with MOOG parts. Needed to be safe and get a sticker for now. Passed RI safety and emissions testing no problem. $40 for a sticker.
The exhaust was original and from sitting the mufflers had rotted through. I ordered a pair of summit brand chambered mufflers for $30 each. They are actually rebranded Jones exhaust Full Boar mufflers. Got these installed for free by a customer. Sounds decent for $70 total including shipping and installation. Definitely turns a few heads for a good reason this time.
New mufflers
The wiper blades, all 3, were dry rotted. Per Crovos recommendation I got the RainX Latitude wipers. They are awesome. But, the rear wiper motor doesn't move the arm. I can hear it but that's it. It probably has a bad connection... All the third brake light contacts were corroded and needed cleaning to work. It was probably $30 for the good blades.
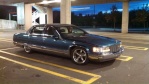
I took off the vogues and caddy wheels because I didn't want to chew up my expensive tires with the bad front end. I put the tires that came with it back on with truck rallies and 50s Buick hub caps. Today I took those rims off and put on the American Racing wheels from the start of this project. Looks pretty bad ass.
Snow covered pic with 50s hubcaps
Rim polishing before and after
Quick shot with new wheels.. No center caps yet because I need to get replacement screws.. For now I had some chrome spray paint I hit the hubs with the blend in.
The car is going great. It looks and sounds mean. I still have a lot of cosmetic stuff to do but it's a nice daily driver for what little money I've spent on it. I'll update this ramble with some pics soon.
Me enjoying my hard work
Last edited by Gastt on Mon Jan 21, 2013 4:18 pm; edited 1 time in total
toomanytoyz
Posts : 3233 Join date : 2008-11-04 Age : 47 Location : Sandown, NH USA
Subject: Re: 94 Roadmaster - $500 budget revival Sat Jan 19, 2013 10:16 pm
Looking good, Timmy! Needs moar lower though.
But you knew that!
Glad you like those blades. They are awesome!
And if you need a rear wiper motor and aren't in a rush, you can have the one off the marshmallow. I'll be deleting it in the spring, or whenever I get a house and can get it into the garage!!!!
Guest Guest
Subject: Re: 94 Roadmaster - $500 budget revival Sat Jan 19, 2013 10:26 pm
Looks good Tim,I got a set of stainless screws for the rims I sold stingroo from tru-value.Got a set of 4 with a odd shaped head and a bit to fit them for about 10 bucks.Cheap insurance to at least slow down the low life thiefs.
Gastt
Posts : 525 Join date : 2010-07-30 Age : 36 Location : Treasure Coast, FL
Subject: Re: 94 Roadmaster - $500 budget revival Sat Jan 19, 2013 10:31 pm
I can wait Bill. I think that wiper motor came from my old DCM woody lol.... I remember bringing one to you.
Flasheroo, I am going to check with my local hardware store. Thanks for the tip.
Subject: Re: 94 Roadmaster - $500 budget revival Sun Jan 20, 2013 12:57 pm
looking good! looks to be in similar condition to my '95 i just bought. it needs brakelines, front tie rods (BADLY!) and mufflers.
do you have a link or model number for the mufflers you bought? are they a very aggressive sounding muffler? im looking for something that's reasonably quite while cruising but loud when you get on it.
my budget is similar to yours too! It's tough having a project car while going to school.
Gastt
Posts : 525 Join date : 2010-07-30 Age : 36 Location : Treasure Coast, FL
Subject: Re: 94 Roadmaster - $500 budget revival Sun Jan 20, 2013 1:08 pm
Benn, check this topic I made on the badass forum.
There are links and my opinion on the mufflers. They are not very loud unless you get on it. Even then they are not obnoxious.
I could spend a lot more money on this wagon. The purpose of the budget was so that I didn't lol. I have two other b body cars that are in much better condition that I want to focus my funds on.
Gastt
Posts : 525 Join date : 2010-07-30 Age : 36 Location : Treasure Coast, FL
Subject: Re: 94 Roadmaster - $500 budget revival Sat Jan 26, 2013 12:31 pm
Short video of the new mufflers
Guest Guest
Subject: Re: 94 Roadmaster - $500 budget revival Sat Jan 26, 2013 7:32 pm
Too loud for me but for a young man such as you,bet you are in love.How do they sound at road speed,any drone?
Gastt
Posts : 525 Join date : 2010-07-30 Age : 36 Location : Treasure Coast, FL
Subject: Re: 94 Roadmaster - $500 budget revival Sat Jan 26, 2013 7:40 pm
It's really not that loud. Under light pedal it's just a slight rumble. It's only loud when you drive it like an a-hole (how I drive it) When my wife is behind the wheel and I follow I can only hear it when she first takes off. There isn't any drone to speak of, it's got cats and resonators still.
Guest Guest
Subject: Re: 94 Roadmaster - $500 budget revival Sat Jan 26, 2013 7:58 pm
Probably sounded much louder due to being inside when you started it up.Do your wheels take 5 or 6 retention screws?I have a set that I ordered years ago in stainless but I know they are a metric thread size.
Gastt
Posts : 525 Join date : 2010-07-30 Age : 36 Location : Treasure Coast, FL
Subject: Re: 94 Roadmaster - $500 budget revival Sat Jan 26, 2013 9:01 pm