|
| | It's a Buick, but it's not something you see very often. Caballero! |  |
|
+37tristanide 94Woody silverfox103 jayoldschool ramrod_mobile Dick Santana Brandt51 Funkwagon455 Cosmos366 dmg4 RedandBlack Jdeshler Lynol brokecello MG Davis Bert Slater 1tireman BigBlackBeaSSt Buicknutt DBeaSSt stewzer55 Sprocket Bobloblaw benn Big Wagon Guy Mark 96 Roady Olds Weighty Eight Gastt Andebe 81X11 1993 Roady-man Wagoninabox bamalongroof phantom 309 buickestate lakeffect JoeT 41 posters | |
| Author | Message |
|---|
Andebe

Posts : 3323
Join date : 2013-02-20
Age : 55
Location : Centerville, IN
| Subject: Re: It's a Buick, but it's not something you see very often. Caballero!  Thu Jun 14, 2018 12:04 pm Thu Jun 14, 2018 12:04 pm | |
| That grill is mesmerizing.  | |
| | | | JoeT

Posts : 680
Join date : 2010-03-06
Age : 68
Location : 48098
| | Subject: Re: It's a Buick, but it's not something you see very often. Caballero! Sat Jun 23, 2018 9:08 pm | |
| Another case of 2 steps forward and 3 steps back... See that little pile of oil absorber on the floor, next to the wood block?  That's the size of the oil puddle you get when you start an engine without remembering to connect the oil pressure gauge line. I was lucky that the engine only ran for a couple of seconds! I had squirted a little bit of gas into the carburetor and the engine fired almost immediately. When it stopped I could hear a gurgling noise from under the car...that's when I discovered that I had not connected the oil pressure gauge line after I removed the temporary gauge that was used for camshaft break-in. Took me over an hour to connect that line; with the body on the frame, there's not much room to work - or see - under there. Next start-up was uneventful. Oil presure is good, all gauges work and I decided to move on to brake bleeding. Larry Schramm did all the pedal work while I handled the bleeders. We got a solid pedal after bleeding the 4 wheel cylinders, but when I started the engine I got absolutely no assist from the power booster. I checked the booster and it was not holding any vacuum, so I had to remove it. Not fun... Here is the booster, coming out of the car after removing that wonderful nut, under the instrument panel and between the two pedal mounting brackets, that holds the master cylinder assembly to the firewall.  Got it apart and found that the new internal vacuum hose had slipped off the power piston connection.  I took off the new vacuum hose and re-installed the original hose. It has a tighter curvature and "wants" to stay on the fitting. But even with the hose connected, the booster would not hold vacuum for more than a few seconds. I disassembled the power piston and found that the air valve seal does not form an airtight seal against the seat unless I pressed on the vacuum piston side of the valve. I dressed the seat to make sure there were no gouges or scratches, but it still won't seal.  I took apart my spare booster assembly and it appears that the seal in the original booster is slightly thicker than the one that came in the re-build kit. I am still looking for the "fix" for this issue. | |
| | | | JoeT
Posts : 680
Join date : 2010-03-06
Age : 68
Location : 48098
| | Subject: Re: It's a Buick, but it's not something you see very often. Caballero! Sat Jun 23, 2018 10:39 pm | |
| So, while the brake headache continues, I am trying to get other tasks done. I started working on the vent window glass installation. I measured and cut the glass setting tape and cut relief notches for the corners:  Sprayed the parts liberally with window cleaner (got that suggestion from the guy who installed the windshield), and began inserting the glass into the vent window frame. I thought I was being patient and careful, but I sliced through the galss setting tape in the area where the drip channel is inserted into the vent window.  The windshield guy reminded me that the glass setting tape can be steretched locally to thin it out if necessary. I'll try that on my next attempt... The rest of the vent window seals and the glass frame went in with only minor trimming/adjusting required.  I've also been working on the front end trim and headlights. My granddaughter likes to inspect my work...  Installed headlight bulbs and checked the light output; they were very dim. With all the powder coating, epoxy primer and paint on the parts, I checked resistance between the headlight attaching screws and the battery's negative terminal. The ground connection was very poor. Rather than scraping coatings, I added a dedicated ground from each headlight bucket to an adjacent core support attachment. Might not be "correct" for judging purposes, but I've done this on several cars now and I like the certainty of this ground connection. You can see the added ground screw and wire in this image.  The arrow points to the ground wire attachment at the upper core support bolt. And now, the lights are bright! Also been working on the remaining front end trim. I was unpleasantly surprised to find that 5 of the 8 attachment holes on the outer fender moldings were partially stripped. I had to install heli-coils in all 5 holes. Quite a stressful activity, given that all these parts are already plated.   Right side molding installed:  It took HOURS to get these to fit this well. I still need to fine-tune the hood fore/aft position to allign the front edges of the hood and fender moldings, but this is getting close! Test-fit of the driver's side headlight door. Fits great!  The headlight doors are attached with chrome-plated, brass barrel nuts, attached to studs mounted to the headlight bezel. I made new studs, using 10-32 screws.  I also re-shaped the barrel screws to allow insertion through the holes in the headlight doors. After installation in the headlight door, the barrel screws were originally flared to retain the barrel screws in the door.  T-3 headlights are installed; next step is to aatach the seals to the back side of the doors and install them. | |
| | | | tristanide
Posts : 10
Join date : 2018-06-25
| | Subject: Re: It's a Buick, but it's not something you see very often. Caballero! Mon Jun 25, 2018 1:20 am | |
| | |
| | | | red280
Posts : 24
Join date : 2018-01-07
| | Subject: Re: It's a Buick, but it's not something you see very often. Caballero! Tue Jul 10, 2018 10:16 pm | |
| Love the car and the quality of your work. Impressive!
Looking forward to the next installment. | |
| | | | monwell
Posts : 58
Join date : 2018-06-25
| | Subject: Re: It's a Buick, but it's not something you see very often. Caballero! Wed Jul 11, 2018 3:23 am | |
| Cool project. The front-end has a one-of-a-kind style. | |
| | | | JoeT
Posts : 680
Join date : 2010-03-06
Age : 68
Location : 48098
| | Subject: Re: It's a Buick, but it's not something you see very often. Caballero! Tue Jul 24, 2018 10:31 pm | |
| It's been a while...busy summer so far! After repeated attempts to bleed the brakes and determining that there is a vacuum leak in the booster system, I decided to remove all the power brake system and install regular brakes. Step 1: removing the booster and master from the firewall...again!  20180712_174933 20180712_174933 by 2manycars2littletime, on Flickr Step 2: Prepare the master cylinder and the master-to-junction block line for installation  20180713_101820 20180713_101820 by 2manycars2littletime, on Flickr Step 3: Re-furbish the manual brake pedal mechanism. The mechanical advantage of the manual system is much higher than that of the power brake pedal linkage.  20180713_102612 20180713_102612 by 2manycars2littletime, on Flickr  20180714_075646 20180714_075646 by 2manycars2littletime, on Flickr Step 4: Install the pedal assembly, master cylinder and brake line. Step 5: Fill and bleed the system. Finally, solid pedal and no leaks! I removed the vacuum fittings, check valve and tubing but I left the vacuum canister under the fender. I plan to re-install the power system at some point. When I was working under the hood and trying to test the power brakes, I saw fuel stains on the driver's side of the intake manifold and it was wet with gas after running the engine. The engine was also running extremely rich. I pulled the carb off the car and found that the passenger side float well was about 60% full, but the driver's side was nearly empty.  20180626_085830 20180626_085830 by 2manycars2littletime, on Flickr The well plug screw was wet and I found that the sealing surface on the screw was gouged and would not seal. I picked up some small diameter O-rings and chose the one that fit the best.  20180626_134143 20180626_134143 by 2manycars2littletime, on Flickr Re-assembled everything and tested with fresh plugs. No more leaks and no fuel stains under the carb! Installed new gaskets on the headlight doors and installed the doors; another layer of bling!  20180627_083807 20180627_083807 by 2manycars2littletime, on Flickr  20180627_102210 20180627_102210 by 2manycars2littletime, on Flickr I have a couple of sets of sun visors, neither of which had the correct perforated material. I cleaned and polished the sunshade pivots and set them aside until they are needed. I stripped the old covers and pads off the substrates. The substrates were delivered to CARS Inc., in Auburn Hills, MI (the Chevrolet restoration guys, not the Buick guys in New Jersey) where they will be re-covered with the correct, perforated material and get new clips.  20180627_110402 20180627_110402 by 2manycars2littletime, on Flickr With all the gauges working, I thought it was time to install the new dash pad.  20180628_083901 20180628_083901 by 2manycars2littletime, on Flickr  20180718_210853 20180718_210853 by 2manycars2littletime, on Flickr I couldn't be happier with the dash pad. It was done by RD Autoline in Bodafors, Sweden. I sent them my bare steel substrate along with color and grain samples. They took it from there and did a GREAT job! | |
| | | | dmg4
Moderator

Posts : 1125
Join date : 2014-08-13
Age : 70
Location : Geneva, New York
| | Subject: Re: It's a Buick, but it's not something you see very often. Caballero! Wed Jul 25, 2018 4:57 am | |
| Astonishing attention to detail here. Do you think it will be ready for Wagonfest NY on Saturday? | |
| | | | RedandBlack

Posts : 564
Join date : 2016-01-19
| | Subject: Re: It's a Buick, but it's not something you see very often. Caballero! Wed Jul 25, 2018 8:33 am | |
| | |
| | | | Andebe
Posts : 3323
Join date : 2013-02-20
Age : 55
Location : Centerville, IN
| | Subject: Re: It's a Buick, but it's not something you see very often. Caballero! Wed Jul 25, 2018 9:07 am | |
| Always enjoy seeing the progress. | |
| | | | convert2diesel
Posts : 958
Join date : 2009-01-05
Age : 72
Location : Manotick, Ontario
| | Subject: Re: It's a Buick, but it's not something you see very often. Caballero! Wed Jul 25, 2018 9:20 am | |
| Love following this thread. Your attention to detail is to be commended.
Quick question. Is it possible that the intake and carb were upgraded previous to you getting the car? Being a child of the fiftys, I was under the impression that the "spread bore" Rochester didn't appear till the early 60s. Had a bunch of square bores (2 two barrels glued together) such as the one used on my 61 Buick nail head and the Carter on my boat engine (383 Chrysler Marine) but didn't run across a spread bore till 64 with a 389 Pontiac.
Good work, but would reconsider replacing the power brakes. Would be a travesty to see all your work go down the tubes just because the brakes weren't up to the task.
Bill | |
| | | | JoeT
Posts : 680
Join date : 2010-03-06
Age : 68
Location : 48098
| | Subject: Re: It's a Buick, but it's not something you see very often. Caballero! Thu Aug 02, 2018 9:23 pm | |
| I had the headliner panels painted recently. I had to modify the dome lamp opening to fit the lamp housing.  20180630_103909 20180630_103909 by 2manycars2littletime, on Flickr This is the original dome light from this car. The chrome bezel has been cleaned and polished and the base has been re-painted gloss white.  20180630_110235 20180630_110235 by 2manycars2littletime, on Flickr The new lens will make it look perfect. Before I install the headliner panels, the replacement retainer strips need to be plated or painted to look like the originals. The original parts appear to have been vacuum metallized or perhaps backed with a "chrome" mylar film to make them look like chrome.  20180702_155106 20180702_155106 by 2manycars2littletime, on Flickr I can get them vacuum metallized on the exposed surface, but that won't look like the original finish. I'm still thinking about how to make these look correct...any suggestions? All the glass frames have been polished or re-plated as required. When it came time to install the new glass in the frames, I started with the driver's front window.  20180703_165130 20180703_165130 by 2manycars2littletime, on Flickr New fasteners, many had to be shortened to keep from contacting the edge of the glass.  20180703_165136 20180703_165136 by 2manycars2littletime, on Flickr I used liquid soap and window cleaner to lubricate the glass tape. It took a lot of convincing with a rubber mallet to get the glass into the frames, but here's the first one:  20180703_203720 20180703_203720 by 2manycars2littletime, on Flickr Glass setting tape trimmed with a razor blade, ready for installation  20180703_203730 20180703_203730 by 2manycars2littletime, on Flickr The rear door window was more challenging.  20180703_204441 20180703_204441 by 2manycars2littletime, on Flickr The 2-piece roller attached to the lower sash is spring-loaded and follows the lower guide. It took me about 20 minutes per side to free these rollers up; the gap between the two plastic pieces was full of dust and rust. There is a spring (wavy) washer between the two plastic sections of the roller. Next, I installed the front seal retainer to the front of the frame. This part gets riveted to the die cast frame and it holds the seal that matches up to the front door frame. You can see the rivet heads in this picture if you look closely at the channel.  20180704_172551 20180704_172551 by 2manycars2littletime, on Flickr Then I taped the glass setting tape to the window, cut relief notches in the tape at the corners and began inserting the glass into the die cast frame.  20180712_123324 20180712_123324 by 2manycars2littletime, on Flickr I used a rubber mallet to coax the glass into place. On one of my mallet hits, the rubber mallet head slipped forward on the handle and the handle struck the edge of the glass. Result: INSTANT glass fracture! Crap...another $50 plus shipping for a new piece of glass.  20180712_140517 20180712_140517 by 2manycars2littletime, on Flickr I decided to try a slightly thinner glass setting tape for the next piece of glass. Installation was easier and uneventful... To prepare the guides for the rear door glass installation, I removed the old cloth from the guides and cleaned and painted the guides, then installed new "bow drill" cloth or felt linings, to match what came out of the original parts. This is one of the front guides for the rear doors:  20180721_103621 20180721_103621 by 2manycars2littletime, on Flickr The same part, all cleaned up and ready for new lining.  20180721_111059 20180721_111059 by 2manycars2littletime, on Flickr The construction of the front door's rear guides are interesting.  20180721_111413 20180721_111413 by 2manycars2littletime, on Flickr The cloth liners were not bonded to the body of the part, but were bonded to a pair of thin sheet metal panels that were then crimped onto the main body.  20180722_121905 20180722_121905 by 2manycars2littletime, on Flickr I flattened out the original parts and duplicated them in light gauge steel. Those old license plates come in handy sometimes! Here is one of the re-assembled window guides, with new linings.  20180724_092150 20180724_092150 by 2manycars2littletime, on Flickr | |
| | | | JoeT
Posts : 680
Join date : 2010-03-06
Age : 68
Location : 48098
| | Subject: Re: It's a Buick, but it's not something you see very often. Caballero! Thu Aug 02, 2018 9:34 pm | |
| - convert2diesel wrote:
- Love following this thread. Your attention to detail is to be commended.
Quick question. Is it possible that the intake and carb were upgraded previous to you getting the car? Being a child of the fiftys, I was under the impression that the "spread bore" Rochester didn't appear till the early 60s. Had a bunch of square bores (2 two barrels glued together) such as the one used on my 61 Buick nail head and the Carter on my boat engine (383 Chrysler Marine) but didn't run across a spread bore till 64 with a 389 Pontiac.
Good work, but would reconsider replacing the power brakes. Would be a travesty to see all your work go down the tubes just because the brakes weren't up to the task.
Bill Bill, Thanks for the compliments! I'll have to check what I wrote earlier; the carb is a correct, square-bore Carter, not a Rochester. I do plan to install the power brake system again, once I get the booster's internal vacuum leak repaired. Hopefully, that will be done soon. | |
| | | | JoeT
Posts : 680
Join date : 2010-03-06
Age : 68
Location : 48098
| | Subject: Re: It's a Buick, but it's not something you see very often. Caballero! Sat Aug 04, 2018 9:21 pm | |
| The replacement piece of window glass went in without any setbacks...   Rear door windows are challenging to install, but I just followed the instructions in the Body Service Manual and referred to my dis-assembly photos a lot.  Adjusting the windows has been difficult and I'm still not done with the process. I am starting with the ventilator window, then working back to the front door and finally the rear door. I had the driver's side almost perfect, but then I realized that the front of the vent window frame was too close to the A pillar. When closing the front door, the ventilator frame touched the windshield molding near the top of the vent window frame. I've got to start all over again, but at least I know I can get there!  I know that reproduction sill plates are available for these cars, but I have about 3 full sets of parts so I thought I'd try cleaning and polishing some of the parts I already have. This is typical of all the parts; a few dings and scratches and serious oxidation.  The areas with the worst dents are circled . I've bumped them out and am beginning to work out the smaller imperfections. This is going to take a lot of time...  Starting to assemble the front bumper:  With the brackets attached to the bumper, I tried lifting the assembled bumper on a beam spanning two floor jacks.  No luck; I opted for two friends to hold the bumper up while I bolted it to the frame. It still needs to be adjusted, but it's amazing how much the bumper made it look like a car again! 
Last edited by JoeT on Sat Aug 04, 2018 11:36 pm; edited 1 time in total | |
| | | | RedandBlack
Posts : 564
Join date : 2016-01-19
| | Subject: Re: It's a Buick, but it's not something you see very often. Caballero! Sat Aug 04, 2018 9:36 pm | |
| Incredible. I might have to make another trip up your way to see it when it's finished.
| |
| | | | JoeT
Posts : 680
Join date : 2010-03-06
Age : 68
Location : 48098
| | Subject: Re: It's a Buick, but it's not something you see very often. Caballero! Sat Aug 04, 2018 11:44 pm | |
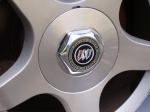
| BIG DAY! First time this car moved under it's own power since I've owned it...and probably since the '70s!  Front bumper adjusted and aligned:  Can't wait to drive this beast!  There are a couple of updates in this photo. First is the polished hubcap and the new emblem, ready for installation.  And beneath the hubcap and emblems are the pre-cut deadener/insulators for the bottom of the spare tire storage compartment. Assembled hubcap installed:   I have 2 sets of these rear bumper trim panels and all of them were corroded and/or dented. These replacements were made by Todd Reiter at Reiter's Metal Craft. They've been primed and are painted with the dull aluminim color for the "silver" areas of the panels.  I made a template from the original parts to help with the masking. The aluminum color stripes are 1/8" wide, the black bands are 11/32" wide.  After masking the aluminum base layer, the black was painted and the mask peeled.  One panel came out perfect, but a few areas of the aluminum paint came off with the masking tape. Do-over went well:  Mocking up the center section of the rear bumper. It's going to look great!  Installing the deadener strips on the spare tire stowage area:  Contact cement and a rubber roller...job done!  Finishing up with the floor pan deadener installation:  Harness covers installed:  | |
| | | | 81X11
Posts : 9876
Join date : 2010-06-23
Age : 50
Location : Round Rock Texas
| | Subject: Re: It's a Buick, but it's not something you see very often. Caballero! Mon Aug 06, 2018 10:10 am | |
| The word STUNNING comes to mind... Amazing work..as-always. Your attention to detail and patience with this project are inspiring. Really enjoying the updates.
-Texas Mike | |
| | | | convert2diesel
Posts : 958
Join date : 2009-01-05
Age : 72
Location : Manotick, Ontario
| | Subject: Re: It's a Buick, but it's not something you see very often. Caballero! Mon Aug 06, 2018 11:24 pm | |
| - JoeT wrote:
Bill,
Thanks for the compliments!
I'll have to check what I wrote earlier; the carb is a correct, square-bore Carter, not a Rochester.
I do plan to install the power brake system again, once I get the booster's internal vacuum leak repaired.
Hopefully, that will be done soon.
Perhaps it was my aging eyesight but the picture of the carb, with the top off, in your previous post really looks like a spreadbore, (larger secondarys) albeit an older design like the Carter with the twin fuel bowls. Do the secondarys neck down before they reach the manifold? Early ramtube? Either way, if it works, don't fix it. Still a stunning display of workmanship. Bill | |
| | | | 81X11
Posts : 9876
Join date : 2010-06-23
Age : 50
Location : Round Rock Texas
| | Subject: Re: It's a Buick, but it's not something you see very often. Caballero! Wed Aug 08, 2018 12:27 pm | |
| | |
| | | | JoeT
Posts : 680
Join date : 2010-03-06
Age : 68
Location : 48098
| | Subject: Re: It's a Buick, but it's not something you see very often. Caballero! Thu Aug 09, 2018 7:10 pm | |
| Mike,
I thought about doing something similar with mine, but I decided to go the restoration route.
There is a lot of work to be done on that car!
That one is a Special Estate Wagon.
It has the standard (Special) interior and it has a "B" pillar/post between the front and rear doors.
| |
| | | | JoeT
Posts : 680
Join date : 2010-03-06
Age : 68
Location : 48098
| | Subject: Re: It's a Buick, but it's not something you see very often. Caballero! Thu Aug 23, 2018 10:55 pm | |
| With all the door glass installed, I began working on the glass alignment. It's been a frustrating experience so far... I started by installing the roof rail weatherstrip retainer and the new weatherstrip.  As I mentioned earlier, the Body Service manual states that the rear door glass must be adjusted to the front door glass and the front door glass is adjusted to the ventilator frame. The ventilator gets adusted to the windshield frame/A pillar, so that's where I started. The driver's side looks pretty close, but I don't have the windshield moldings yet. The moldings I have are for a different body style. I will start on the passenger side. Got a long way to go...   Started by installing the roof rail weatherstrip. This is the best alignment I could achieve between the ventilator and the front door window. It looks good in this photo, but the rear of the door glass is not touching the weatherstrip.  No matter what I did, I couldn't get the back corner of the glass to contact the weatherstrip. Going back through the shop manual instructions, I found a reference to the upper attachment between the ventilator frame and the outer door frame. I had not installed that attaching screw and I couldn't get the screw to engage the threads, so I had to remove the vent window assembly and repair the threaded hole in the door frame. The arrow points to the guilty culprit.  After repairing the threads, I re-installed the ventilator and tried to set the ventilator relationship to the windshield frame. I installed the windshield reveal molding so I could see the exact relationship between the ventilator and the windshield pillar.  The ventilator and pillar relationship looks great, but I still can't get the upper, rear corner of the door glass to contact the weatherstrip unless I allow the front of the glass to travel at least 1/4" beyond the top of the vent window frame. The Service Manual states that the upper, rear corner of the window can be adjusted to travel higher by raising the rear attachment of the inner panel cam. The circled area in this picture highlights the rear cam adjustment on the left front door.  I've done that, but I still could not get enough additional travel. I lengthened the slot for the rear attachment point, giving additional upward adjustment to the rear cam attachment, but that didn't give enough additional travel, either. That led me to look at the window frame and glass assembly itself. This window frame had to be repaired and reinforced due to corrosion damage at the bottom of the channel. I feared that the repairs increased the thickness of the lower sash enough to force the forward, top corner of the glass too high in the vehicle. I also saw that I could get additional room for adjustment if the back of the door glass frame wasn't so tight against the rear guide. I removed the window from the door and took the glass out of the frame. I re-set the glass, concentrating on getting the glass as far rearward in the rear sash as possible. The re-installed glass was easily adjusted to align with the ventilator.  Now, on to the rear door... | |
| | | | RedandBlack
Posts : 564
Join date : 2016-01-19
| | Subject: Re: It's a Buick, but it's not something you see very often. Caballero! Thu Aug 23, 2018 10:58 pm | |
| Ah yes - the joys of old cars that some people forget. Not everything is simple on them.
You have far more patience than I. | |
| | | | dmg4
Moderator
Posts : 1125
Join date : 2014-08-13
Age : 70
Location : Geneva, New York
| | Subject: Re: It's a Buick, but it's not something you see very often. Caballero! Fri Aug 24, 2018 6:05 am | |
| And they say Job had patience! | |
| | | | JoeT
Posts : 680
Join date : 2010-03-06
Age : 68
Location : 48098
| | Subject: Re: It's a Buick, but it's not something you see very often. Caballero! Thu Aug 30, 2018 10:49 pm | |
| My helpers finishing up the deadener in the rear compartment.  Now that the passenger side windows are adjusted, I am moving to the driver's side. I am still missing one of the reveal moldings, but I can get everything lined up and ready. I started by aligning the ventilator frame to the A pillar. I noticed that the inner panel moved when I tried to tighten the attaching bolts. I found that there were 3 spot welds holding the 3 layers (inner panel, reinforcement and outer panel) together. One of the 3 welds only held 2 layers together, causing a fatigue failure adjacent to the weld. Got some advice from some VERY experienced friends... They recommended drilling and tapping 3 holes in the 3 layers, then using 3 fine thread set screws to lock the layers together. The set screws and the interfaces between all 3 layers are coated with JB Weld epoxy.   Repair worked great!
Last edited by JoeT on Thu Aug 30, 2018 10:55 pm; edited 1 time in total (Reason for editing : spelling) | |
| | | | 81X11
Posts : 9876
Join date : 2010-06-23
Age : 50
Location : Round Rock Texas
| | Subject: Re: It's a Buick, but it's not something you see very often. Caballero! Fri Aug 31, 2018 1:25 pm | |
| The window adjustments made my head explode... Your patience certainly is paying off...but wow..
Nice Work! | |
| | | | JoeT
Posts : 680
Join date : 2010-03-06
Age : 68
Location : 48098
| | Subject: Re: It's a Buick, but it's not something you see very often. Caballero! Sun Sep 02, 2018 10:41 pm | |
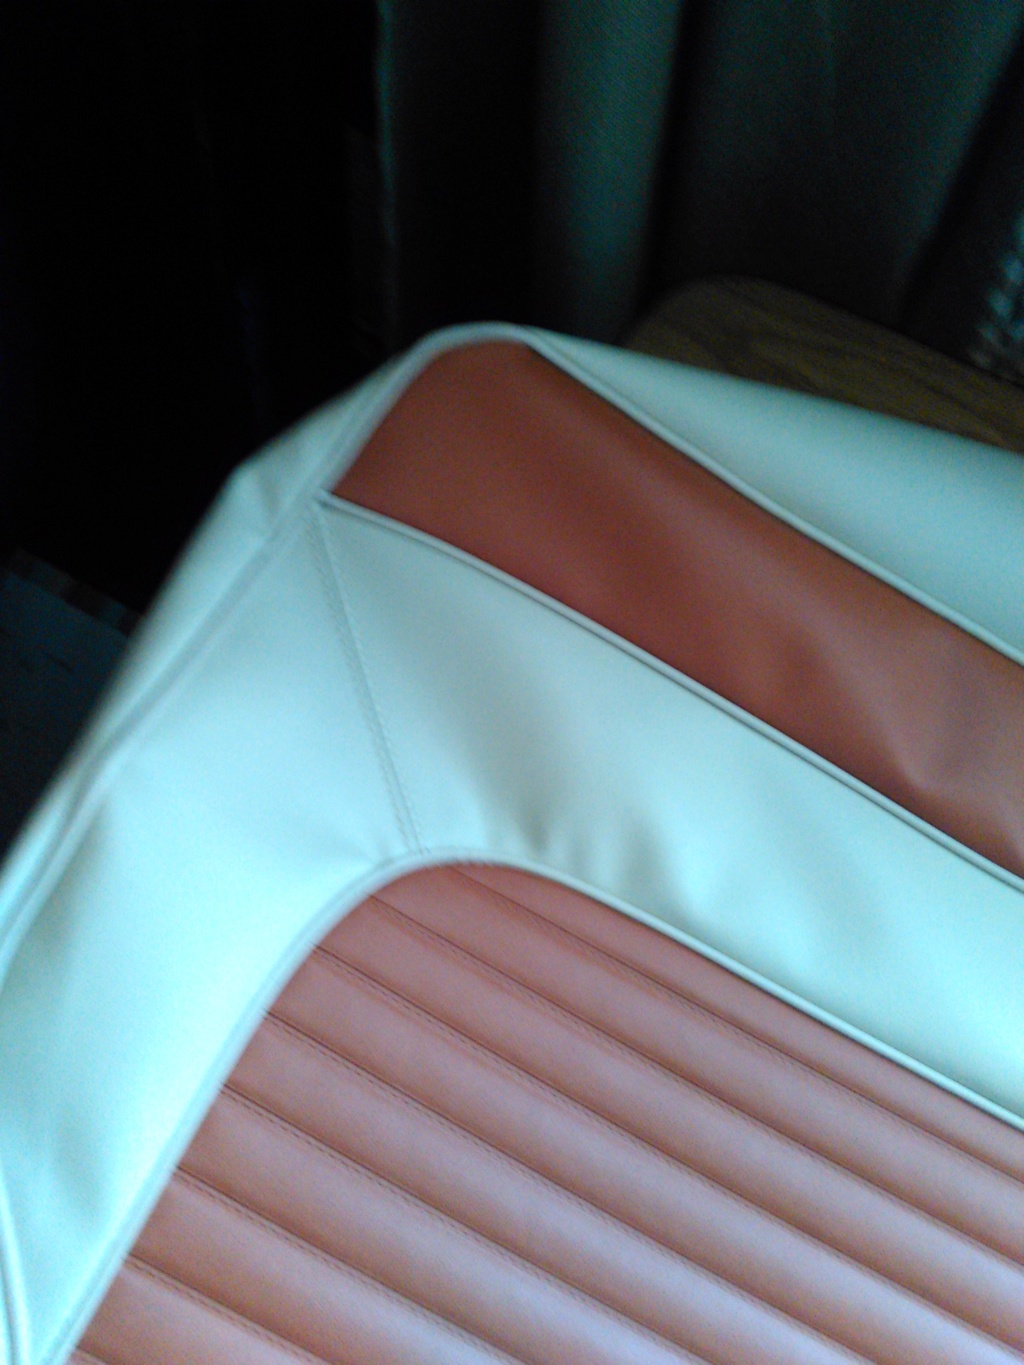
| After repairing the broken weld, I installed the ventilator and lined it up to the A pillar. On this side of the car, window alignment was easier and took a lot less time then the passenger side. Part of the time savings was due to what I learned on the passenger side, but the other big time-saver was being able to get the glass aligned without dis-assembling the window sashes to re-position the glass in the perimeter frames. All 3 of the windows on the driver's side (vent, front door and rear door), were correctly seated in the sashes.  Now, on to one of the challenges I face with the interior... These cars were built with a molded trim cover over the inner rear wheel wells.  Most of the restored cars have had those molded covers replaced with sewn vinyl covers.  I want my wheel wells to look like the originals....so... My friend Jim and I decided to work on this little project together. Jim found some supported vinyl with a very stretchy, knit backing. The grain is a very close match to the original grain, as it appeared under the folding seat latches. We thought about this a long time before we took the first step... We cut a piece of the vinyl with enough extra material to allow us to hold the perimeter and we attached the lower, front corner to the inner fender, at the floor.  It took us a couple of hours over two evenings, but with me pulling at the rear and along the perimeter and Jim applying the adhesive, warming the vinyl with a heat gun and stretching the vinyl into position, we were able to get a very nice result.   The puckers around the perimeter will be trimmed away and any wrinkles near the edges of the wheel well will be completely hidden by the load floor and the trim moldings that surround the floor. Now, I have to touch up a scuff mark and dye the vinyl to match the dark tan color of the interior. This is exactly what I hoped to accomplish! One down, one to go!  | |
| | | | buickestate
Moderator

Posts : 3301
Join date : 2008-11-04
Age : 60
Location : Chatham Ontario
| | Subject: Re: It's a Buick, but it's not something you see very often. Caballero! Fri Sep 14, 2018 9:09 pm | |
| - Andebe wrote:
- That grill is mesmerizing.
Harvey Earl's design team used drawer pulls from a local hardware store when they designed this grill | |
| | | | buickestate
Moderator
Posts : 3301
Join date : 2008-11-04
Age : 60
Location : Chatham Ontario
| | | | | buickestate
Moderator
Posts : 3301
Join date : 2008-11-04
Age : 60
Location : Chatham Ontario
| | Subject: Re: It's a Buick, but it's not something you see very often. Caballero! Fri Sep 14, 2018 9:41 pm | |
| | |
| | | | buickestate
Moderator
Posts : 3301
Join date : 2008-11-04
Age : 60
Location : Chatham Ontario
| | Subject: Re: It's a Buick, but it's not something you see very often. Caballero! Fri Sep 14, 2018 9:44 pm | |
| | |
| | | | buickestate
Moderator
Posts : 3301
Join date : 2008-11-04
Age : 60
Location : Chatham Ontario
| | Subject: Re: It's a Buick, but it's not something you see very often. Caballero! Fri Sep 14, 2018 9:50 pm | |
| | |
| | | | buickestate
Moderator
Posts : 3301
Join date : 2008-11-04
Age : 60
Location : Chatham Ontario
| | Subject: Re: It's a Buick, but it's not something you see very often. Caballero! Fri Sep 14, 2018 10:08 pm | |
| | |
| | | | Andebe
Posts : 3323
Join date : 2013-02-20
Age : 55
Location : Centerville, IN
| | Subject: Re: It's a Buick, but it's not something you see very often. Caballero! Sat Sep 15, 2018 4:44 pm | |
| Both wagons are gorgeous! Nice work Pat,and of course Joe. | |
| | | | JoeT
Posts : 680
Join date : 2010-03-06
Age : 68
Location : 48098
| | Subject: Re: It's a Buick, but it's not something you see very often. Caballero! Sat Sep 15, 2018 9:36 pm | |
| Pat's trim work looks GREAT!!!
I'm really looking forward to building the seats in the next few weeks.
The trim covers are beautiful! | |
| | | | JoeT
Posts : 680
Join date : 2010-03-06
Age : 68
Location : 48098
| | Subject: Re: It's a Buick, but it's not something you see very often. Caballero! Sat Sep 15, 2018 9:36 pm | |
| The interior of this car was typical of a desert car that spent too much of its life in the sun... These are the driver's side door trim panels; crispy critters!  Notice that the rear door "Century" script emblem is slanted rearward and the front door script is slanted forward... The rear door is correct; the car was built with 3 of the forward-slanted emblems. Having come from the OEM interior trim business, I suspect that someone pierced the driver's door panel in the wrong punch press or upside down in the die, depending on how the tooling was constructed. They either had to scrap the panel or install the forward slant emblem and ship the part. Obviously, they chose the latter course. I will correct the error when I make the replacement part, but part of me wants to build it wrong because that's the way it was done 60 years ago... I dis-assembled the panels to understand how they were built; the sequence of assembly is critical to re-creating the original appearance. This is a de-constructed rear door trim panel:  I used heavy kraft paper to create patterns from the original parts.  and made test parts using scrap vinyl from previous projects. The ivory colored material is excess from a 68 GTO vinyl roof cover...  After verifying the contours and shape of the main panel, I traced the original part shape onto new "100 point" (0.100" thick) hardboard.  I laid out the patterns on the main panel, along with the moldings to verify the seam positions, cut lines and armrest & molding attachment points.  I still wasn't ready to cut the vinyl parts, so I used some of the flawed areas of the correct vinyl material to cut my "final" test parts.  Here, I have peeled the laminated padding back from the outermost edges of the dielectrically embossed inserts to exactly match the way the original pieces were cut.  Everything looked correct, so I proceeded to cut the "production" parts...  And also cut the loft pads for the door panels and pre-punched the holes for the window regulator and latch control spindles, as well as all the attachment holes for the armrests and moldings.  I also straightened the perimeter metal edge-fold pieces and replaced the corroded parts by modifying tri-five Chevy components:  I bonded the pads to the main panel substrate with permanent contact adhesive  Verifying position of the sub-assembled panels onto the main panel with the trim moldings  One of the "Century" emblems had a missing stud, so I fashioned and threaded a replacement stud and drilled and tapped a blind hole in the emblem into which the new stud was epoxied.   If anyone has one of these rearward slanting emblems, I need another one! | |
| | | | JoeT
Posts : 680
Join date : 2010-03-06
Age : 68
Location : 48098
| | Subject: Re: It's a Buick, but it's not something you see very often. Caballero! Sat Sep 15, 2018 11:51 pm | |
| Before installing the vinyl cover on the left rear inner wheelhouse, I did a little body work to smooth out a few dents and battle scars.  After another adventure with spray adhesive and heat gun!  Shortly after Labor Day, I visited my friend Pat. He is building the seats and helping me with the door trim panels.  The seat covers are looking great!  He developed patterns for the door armrest covers and he sewed the parts while I was there.  We were not able to build any of the main seat parts, but we determined what still needed to be done before we could install the covers on the frame & spring assemblies. When I got back home with the armrest covers, I started assembling the door trim panels. I began with the right, rear door. I installed the armrest base to the main panel with the original steel tabs and rivets where the tabs were broken or missing. Then I added a layer of batting and the trim cover   Mocked up the armrest with the upper sub-assembly  The right front door armrest had significant corrosion damage around the upper pull handle and the entire bottom perimeter area. I was not looking forward to all that welding repair, but on a recent visit to CARS (Chevrolet reproduction supplier) in Auburn Hills, MI, I noticed several armrest bases that looked a lot like the Caballero armrests. Surprise! 1955 Chevy Nomad front armrest bases are the SAME as the 58 Buick Century bases. The reproduction parts are made of ABS plastic, so I fabricated 3 retainer tabs to duplicate the original retaining tab designs. The molde armerest upper pad might need minor modification, but the contour and size is correct.   I've also been working on the upper "C" pillar trim panels. These are steel substrates, covered with a thin layer of padding and a vinyl cover.  Earlier this year, I installed the clock after having it refurbished and it only worked for a few minutes. I recently pulled the clock out of the dash and was surprised to see a piece of gasket material trapped under the clock's second hand. As I removed the clock from the car, the gasket dropped away from the second hand and the clock began to run. I dis-assembled the clock and found that the gasket between the housing and the lens had been glued in by the rebuilder, but it he had re-installed the pieces of the original, brittle gasket. I removed the gasket pieces, cleaned and re-painted the black bezel under the lens, made a new gasket and re-assembled the clock. It is back in the dash and working perfectly.   | |
| | | | 94Woody

Posts : 2442
Join date : 2008-12-02
Age : 49
Location : Ocala,FL
| | Subject: Re: It's a Buick, but it's not something you see very often. Caballero! Sun Sep 16, 2018 10:05 pm | |
| Simply amazing. I love the work you are putting into this wagon. Excellent attention to detail. | |
| | | | 81X11
Posts : 9876
Join date : 2010-06-23
Age : 50
Location : Round Rock Texas
| | Subject: Re: It's a Buick, but it's not something you see very often. Caballero! Tue Sep 18, 2018 9:42 am | |
| Amazing work, and really glad to see Pat involved in this as well. Loving watching this all come together! | |
| | | | Andebe
Posts : 3323
Join date : 2013-02-20
Age : 55
Location : Centerville, IN
| | Subject: Re: It's a Buick, but it's not something you see very often. Caballero! Tue Sep 18, 2018 11:19 am | |
| One of my favorite build threads of all time. Thanks for sharing. | |
| | | | Sprocket
Posts : 6141
Join date : 2008-11-04
Location : Palm Beach County
| | Subject: Re: It's a Buick, but it's not something you see very often. Caballero! Mon Sep 24, 2018 6:20 pm | |
| I've been away from this thread for too long.........
AMAZING is all I can say, just WOW! | |
| | | | JoeT
Posts : 680
Join date : 2010-03-06
Age : 68
Location : 48098
| | Subject: Re: It's a Buick, but it's not something you see very often. Caballero! Wed Oct 03, 2018 12:19 am | |
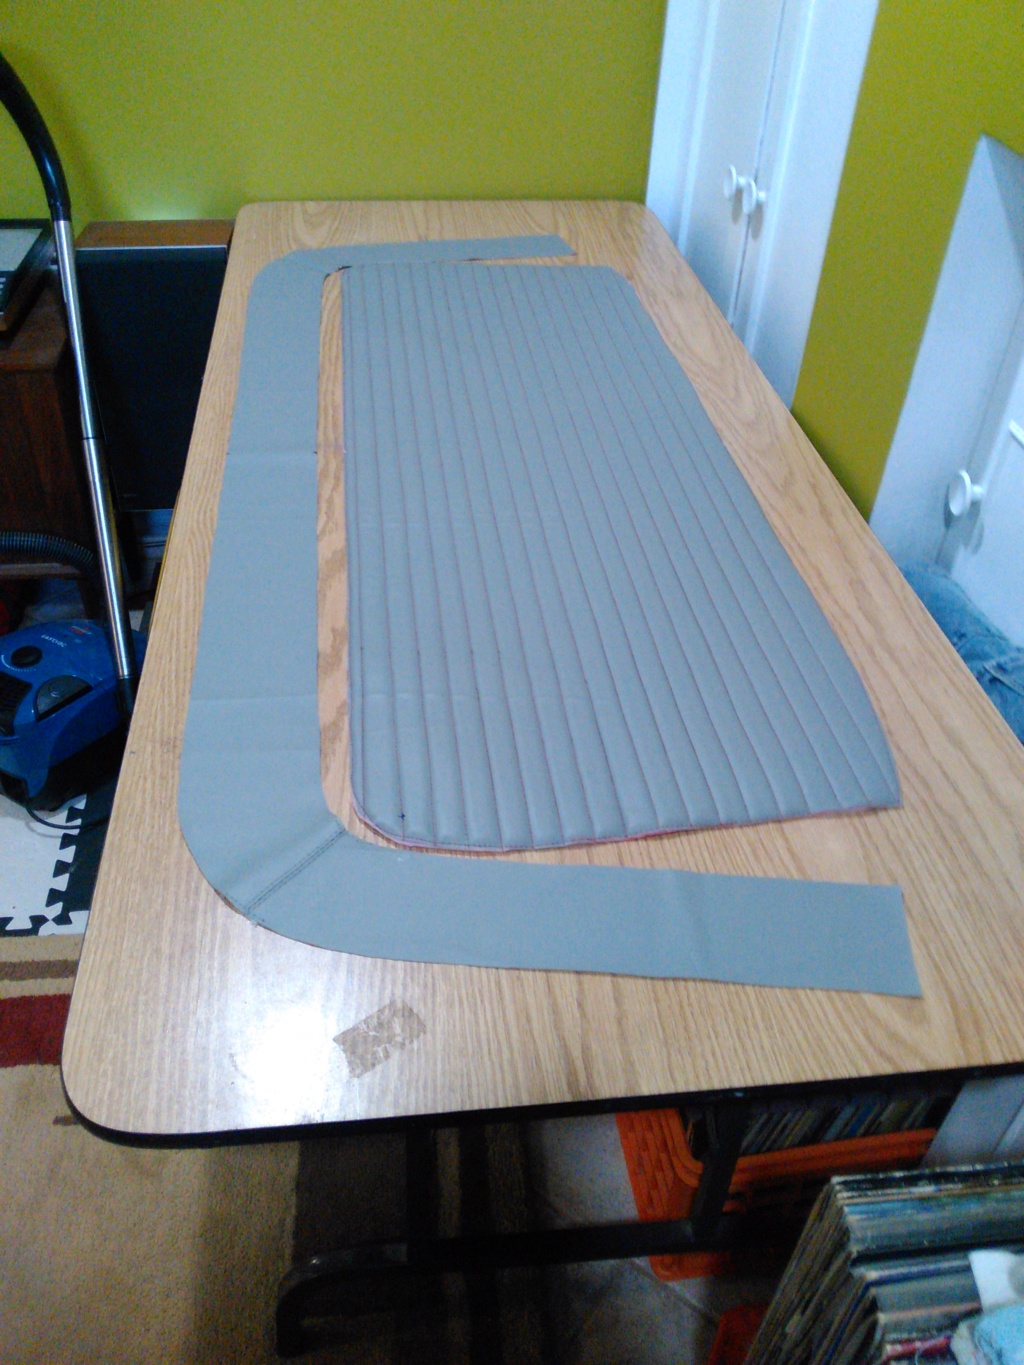
| Work continues on the rear door trim panels.... Test fitting the upper trim assembly. All the tan and beige vinyl components are mounted to a .030" thick hardboard foundation, which is then mounted to the main substrate panel.  Mocked up in the car:  Those wrinkles around the upper, front and rear edges are there because the perimeter vinyl hasn't been edgefolded to the main substrate yet. Satisfied with the progress on the right rear door, I started on the left rear.   Then, mocked up quarter trim panels to verify the shape and the color split lines.  This is what came in the car, so I had to do a lot of interpolation:   I didn't like the loose appearance of the cover, so I kept fine-tuning the sustrate and cover to improve the fit. More progress on the rear door trim. I pre-assembled the 2 bottom sections in preparation for sewing them to the main panel.  I've been looking for an industrial sewing machine to be able to do more of my own trim work. 57BuickJim and I went in on this Singer 111W155 "walking foot" machine. It will sew stuff that my little home machine could only dream of!  Pre-installed the lower trim to the door panel with staples that will be removed after sewing.  Ready for edgefolding and moldings!  With the sewing done, I installed the metal edging to the substrates. I had to stop all the sew lines short of the edges to allow for installation of the edging. I tied off the stitch lines to keep them from unraveling and handstitched the outermost inch of the trim so the edgefolded panels would have the correct appearance. I also had to replace several of the attaching "nails" where the originals were broken or missing. Turns out they are standard 1" ring shank nails!  The steel edging gives a smooth appearance to the perimeter of the panel and also incorporates barbs to retain the vinyl as it is edgefolded around the back of the panel.  | |
| | | | Andebe
Posts : 3323
Join date : 2013-02-20
Age : 55
Location : Centerville, IN
| | Subject: Re: It's a Buick, but it's not something you see very often. Caballero! Wed Oct 03, 2018 6:00 pm | |
| Vinyl on the rear tire wells looks better than factory!  | |
| | | | JoeT
Posts : 680
Join date : 2010-03-06
Age : 68
Location : 48098
| | Subject: Re: It's a Buick, but it's not something you see very often. Caballero! Sat Oct 06, 2018 11:43 pm | |
| These wagons were equipped with molded, perforated hardboard headliner panels. Pete Phillips (Buick Bugle Editor) had previously posted on the AACA forum about the difficulties he encountered when trying to install the reproduction panels. He used a steamer to soften the hardboard panels, but they still cracked. He also shared that the plastic retainers also fractured when he tried to install them, even though they had been softened with a lengthy exposure to hot, Texas sun. Based on Pete's experience, I asked around for ideas. Larry Schramm and another restorer friend of mine both recommended steaming the panels in a steam chamber to soften them before trying to install them. Here's the steam box I built. In the plastic bag are 57BuickJim's panels from one of his wagons; I planned to use them as patterns.  I decided to use the steel retainers as patterns instead of risking any damage to Jim's parts. I used the retainers to make a pattern to pre-form the headliner panels.  It's a piece of luaun underlayment, attached to a pair of 1X8 boards in the desired shape of the headliner panels. I didn't worry about making a form for each panel; I knew the parts would be "close enough" if I used an average shape. In this photo, you can see the relief slots I cut to enable bending the luaun to shape. I cut through 2 of the 3 payers of the underlayment so it would easily flex, then screwed the luaun to the 1x8s.  Here's the form installed in the steam box. I lined the box with 6 mil plastic film and layed a sheet of plastic film between the pattern and the part being steamed.  Lid on the box and steam nozzle inserted in the side of the box:  If you look closely at the far corner of the box, close to the roll of blue paper towels, you can see steam wafting out from the lid. The steam generator is this little beauty:  It is marketed as a weed killer! It will generate steam at about 300F and up to 65psi. It worked great to supply steam for the chamber. After a few minutes in the box, the panels were quite flexible. I loaded them into the car and help them in position until they dried, using a variety of implements. The crutches worked great!    The soft pads helped protect the painted surface of the panels. I also used spring clamps and short pieces of the plastic retainer to keep things in place.  After allowing the panels to dry completely, I proceeded to install the retainers. When I looked at the way the panels and retainers are installed, it appeared that the installation sequence had to begin at the windshield and progress to the rear of the car. To begin, I had to button up the dash and install the windshield garnish moldings and visor brackets. Before installing the upper dash panel, I finished up the wiring and added redundant grounds to the instrument panel and radio circuits. My previous experience has taught me that I can't rely on good ground connections through all the epoxy primers, powder coating and layers of paint on restored parts. I add terminal strips that connect the individual device or circuit grounds directly to the body or frame. In this case, the terminal strip is connecting the insturment cluster/gauges/dash lights/radio and antenna ground strap to one of the IP to firewall brace attachments, which was cleaned to provide a good metal-to-metal connection.  New speaker mounted to the upper panel  It took me a long time - and MANY tries - to install the upper panel to the IP carrier with an acceptable fit to the dash pad. This is one of the early trials:  Getting close!  Before installing the first (front) panel, the exterior windshield reveal moldings must be installed. The reveal molding clips are attached to the body by studs that go through the windshield header. The attaching nuts are installed through clearance holes in the windshield header, above the headliner panel. Here are 3 of the reveal molding clips and the flange nuts that are used to retain the clips. You can see a little bit of black sealer on one of the nuts; that is how I kept the flange nuts from dropping off the nut driver and falling into the body structure.  Here's a close look at one of the clearance holes with the nut installed on the clip stud; not a lot of room to work!  Exterior moldings installed...  The front headliner panel is retained at the front by the rear view mirror bracket, the windshield header garnish molding and the sun visor brackets. The sides of the panel are retained by the roof rail garnish moldings. The rear edge is retained by the snap-on plastic retainer. First step is to install the mirror support and the two upper header garnish moldings  The upper, outboard corners are also supported by the A pillar garnish moldings. The garnish moldings are installed after the lower windshield base moldings.  Between each of the headliner panels, there is a metal retainer onto which snaps a plastic retainer molding. I found new moldings from another Buick Club member; painted the back side to replicate the original appearance, and I am installing the first piece here:  These parts are quite stiff and need to be heated to allow them to follow the roof contour without breaking. I have tried a home hair dryer and a heat gun to heat the plastic pieces. I found it too easy to overheat the part with the heat gun, so I will use the hair dryer on the remaining parts. Here, you can see the straight, plastic part hanging down from the headliner. Heating the part allowed me to shape it tightly to the roof, and then I had to trim it to the proper length to fit tightly into the end cap at the roof rail molding. Here's the passenger side of the completed installation.  And a look at the driver's side, showing the end cap above the roof rail molding:  Second panel is retained by the palstic retainer shared with the front panel, the roof rail moldings and another plastic retainer at the rear edge. This is the panel that will hold the dome light.  Two panels down, 3 to go! | |
| | | | Andebe
Posts : 3323
Join date : 2013-02-20
Age : 55
Location : Centerville, IN
| | Subject: Re: It's a Buick, but it's not something you see very often. Caballero! Sun Oct 07, 2018 12:09 pm | |
| What,over all ready? I just started the popcorn!  Love seeing the progress. | |
| | | | JoeT
Posts : 680
Join date : 2010-03-06
Age : 68
Location : 48098
| | Subject: Re: It's a Buick, but it's not something you see very often. Caballero! Sun Oct 21, 2018 9:08 pm | |
| The rest of the headliner installation went well; no broken panels, no cracked or broken retainers. I think it turned out great. I am SO glad this is done!   One of the things I forgot to show previously is the "anti-rattle" felt pads I installed on the instrument panel, dash panel and windshield lower garnish moldings. These small pieces of adhesive-backed felt were applied to all the the metal-to-metal interfaces.  The fender-mounted rear view mirrors are installed, too. These are the Buick Accessory mirrors; I think they are very cool.   Next step is to install the quarter windows. After looking at the fit of the gasket to the inner quarter panel, it appears that the upper reveal molding retainers must be installed before the glass is installed. Here's the driver's side reveal molding in position. There are 2 separate moldings nested together and retained by a set of clips that go through both moldings and through mating holes in the upper sash.  The clips have studs approximately 2 1/2" long which are retained to the vehicle with brass barrel nuts.  I tried to fit the glass into the openings (with help!) 3 times...no luck. I asked the pro who installed the windshield and liftgate glass to give me some guidance. We tried to load the glass into the opening and he told me that the aftermarket gasket needs to be trimmed. Another project for another day... | |
| | | | JoeT
Posts : 680
Join date : 2010-03-06
Age : 68
Location : 48098
| | Subject: Re: It's a Buick, but it's not something you see very often. Caballero! Sun Nov 11, 2018 10:21 pm | |
| The tail light housings should be back from chrome plating soon, so it's time to get the sockets, pigtails and lenses ready. Here is one of the original tail light pigtail & socket assemblies and the new replacement.  I removed the grommets from the original parts and installed them on the new pigtails  I also had to replace the terminals and pigtails in the license lamp sockets. The rear bumper was removed without first disconnecting the license lamps from the body harness.  All better!   So many things to finish! Here, you can see the vinyl cover prepared for adhering to the driver's side kick panel.  20181010_122612 20181010_122612 by 2manycars2littletime, on Flickr Sprayed contact adhesive on both parts, trimmed & wrapped the edges and used a rubber roller to apply enough pressure to set the adhesive bond. Here's the driver's side as installed:  20181010_125439 20181010_125439 by 2manycars2littletime, on Flickr Passenger panel ready fpr bonding:  20181010_130503 20181010_130503 by 2manycars2littletime, on Flickr Assembled with 2-part rivets and installed in the car:  20181011_080940 20181011_080940 by 2manycars2littletime, on Flickr Months ago, I partially assembled the rear door trim panels. I recently installed the metal edgefold retainers and bonded the material around the perimeter.  20181012_085424 20181012_085424 by 2manycars2littletime, on Flickr The panel did not fit properly; I had not noticed that the attaching "nails" were not all equidistant from the edge of the panel. There at least 3 different dimensions for the position of the nails from the edge of the panel.  20181012_173614 20181012_173614 by 2manycars2littletime, on Flickr Compounding the problem...I used aftermarket repair parts to replace the missing nails; there are multiple versions of these parts as well.  20181012_173620 20181012_173620 by 2manycars2littletime, on Flickr I removed the edgefold reinforcements and test-fit the panel again.  20181013_093437 20181013_093437 by 2manycars2littletime, on Flickr Even without the nails, the base panel does not fit properly. Re-checking dimensions, I found the armrest was installed too low on the panel, driving the panel too high on the door when installed. Lesson learned: I had assembled the trim panel without installing the armrest attaching plate to the door inner panel. Dumb mistake...I know better. The "fix" will require re-working the armrest position and revising the perimeter cut lines to accommodate the various nail positions. I'm glad I found this before I made the same error on all 4 doors... | |
| | | | JoeT
Posts : 680
Join date : 2010-03-06
Age : 68
Location : 48098
| | Subject: Re: It's a Buick, but it's not something you see very often. Caballero! Fri Nov 16, 2018 11:13 pm | |
| Lots going on recently... Liftgate glass is IN! I was reluctant to tackle this myself, so I got help from the glass installer who installed the windshield. I was lucky enough to get a tinted liftgate glass panel from another Caballero owner (57BuickJim). His parts car had tinted glass and he agreed to swap it for my clear glass.  Painted the wheel well trim to match the interior.  Installing rear compartment load floor panels.   This is the front edge of the rear load floor. There is a vinyl closeout panel that covers the floor pan from the middle of this part to the rear of the floor pan, under the rear seats.  This part was created by using the crispy, original remnants that were in the car when it was disassembled. It got us close to what was required, but the patterns needed refinement. I used muslin material to develop and confirm the revised patterns.   Time to cut & sew! I cut the vinyl pieces and used 2-sided tape to hold the hems down while sewing the hems.    A hardboard reinforcement was sewn to the upper edge of the original panel. I incorporated a panel edge molding (sold for 1/4" wall panels) to provide a more defined, straight edge.  The upper reinforcement is screwed to the waterfall, below the load floor. Then the vinyl is folded down and lays onto the waterfall and floor pan. The cutouts for the seat bottom stop brackets are made and this part is done.  This is when I realized that I needed inboard stops for the split folding seat. This car originally had a full width second seat, requiring only 2 bottom stops. The split folding seat needs 4 stops. Two pieces of 1/8" flat stock and some bending and drilling yielded these little gems  Installed & painted, ready for seat installation:  First test fit of the carpet...  The "B" pillar cover panels must be completed before I make the final cuts and install the carpet. Muslin test parts sewn to confirm patterns are correct.  These were interesting panels to construct. There are hardboard panels behind each of the 3 curved surfaces. It all gets sewn together "inside out", then inverted into the "vinyl side out" orientation for installation into the body.  Masked the pillar flanges and sprayed adhesive on the part and the flange edges, then applied the part to the pillar. The edges are pulled taut to the pinch weld flanges at the front and back of the B pillar, then the painted steel retainer moldings are pressed over the flanges, trapping the vinyl in place.   These turned out great!   | |
| | | | JoeT
Posts : 680
Join date : 2010-03-06
Age : 68
Location : 48098
| | Subject: Re: It's a Buick, but it's not something you see very often. Caballero! Tue Nov 20, 2018 10:58 pm | |
| With the pillar trim done, carpeting and folding seat mechanisms come next. Most restored Estate Wagons & Caballeros have the rear seat stanchions bolted on top of the carpet, but all the photos of original, unrestored wagons I've seen clearly show a simple slot in the carpet, with the stanchion protruding up through the carpet. Like this:  The folding seat frames can be adjusted in just about every direction, so it took quite a bit of measuring and trial fits to get the seats to appear level and even in the car.   Initial cut around seat stanchion.  I spent hours making vinyl "sleeves" to trim out the openings around the seat stanchions.  In the end, I decided that the sleeves didn't help and they weren't part of the original design, so I removed the sleeves and will make the slots look as good as possible. No matter how I positioned the rear section of the carpet, I couldn't get a consistent position of the carpet openings in the rear door openings. 57BuickJim lent me his new carpet to compare to mine. The length of the rear door opening on his carpet was more than 1" shorter than mine. To determine why the two sides fit differently, I folded my carpet over at the center line and found that the left and right pillar cut-outs did not match.  Trimming the passenger side pillar opening allowed the door openings to line up properly on both sides of the passenger pillar and door openings.  I wasn't comfortable trying to sew this on my machine, so I hand-stitched the binding back on to the re-cut edge.  The floor carpet is a typical 2-piece design. The rear section of carpet goes from the middle of the front door opening to the rear edge of the floor pan, under the rear seat. The front section of the carpet goes from the firewall/toe panel to the middle of the front door opening. This is the pre-cut jute underlayment for the front carpet. Minor trimming was required at the bottom of the A pillar, at the center relief cut and below the steering column. Holes had to be cut for the dimmer switch and the accelerator rod.  Front carpet positioned.  Next comes the rear (underseat) heater installation.
Last edited by JoeT on Tue Nov 20, 2018 11:06 pm; edited 1 time in total (Reason for editing : spelling) | |
| | | | Andebe
Posts : 3323
Join date : 2013-02-20
Age : 55
Location : Centerville, IN
| | Subject: Re: It's a Buick, but it's not something you see very often. Caballero! Wed Nov 21, 2018 11:24 am | |
| Always enjoy these updates. Bravo,Sir... | |
| | | | JoeT
Posts : 680
Join date : 2010-03-06
Age : 68
Location : 48098
| | Subject: Re: It's a Buick, but it's not something you see very often. Caballero! Thu Nov 29, 2018 11:44 pm | |
| This is what the rear seat heater looked like when I acquired the car:  Mostly mangled aluminum fins, but the tubing looked good. I had the local radiator repair shop pressure test the unit; it passed with flying colors. It took a couple of hours to get the fins to this point. I used tweezers, a fin comb, surgical hemostats and very small needle nose pliers...and a LOT of patience.   I worked on the fins until I could see air gaps between every fin, then a final cleaning to prepare for paint.   Painted heater unit with mounting brackets, attaching screws and newly fabricated gaskets:  In-cabin installation is quite simple. Each mounting bracket required 2 screws and there is one center clamp.  I'm going to wait to connect the underfloor hoses until I have the car up on a lift. Now, back to interior bits! These are the components that will become the rear door "dogleg" trim panels. They close out the rear door opening, from the rear edge of the sill plate up to the roof rail molding.  Top: stamped steel substrate (original to this car, with some corrosion repairs already completed) Middle: 1/8" thick non-woven pad Bottom: trim cover and windlace, already sewn together. The trim cover and pad patterns were developed using the original "crispy" pieces that came off the car. Trim cover and windlace after sewing and before attachment to the steel panel:  One edge of the steel substrate has pre-formed lance tabs to puncture and retain the windlace. The opposite edge is bonded with trim adhesive. Binder clips make great clamps for this kind of work...  Ready!  | |
| | | | Sponsored content
| | Subject: Re: It's a Buick, but it's not something you see very often. Caballero! | |
| |
| | | | | | It's a Buick, but it's not something you see very often. Caballero! | |
|
Similar topics | |
|
| | Permissions in this forum: | You cannot reply to topics in this forum
| |
| |
| |