Admittedly, my skills in auto repair are moderate to minimal, but I have built and worked on boats, so I'm pretty good at keeping water out of where it does not belong, and at removing it if it happens to get in. I'm also blessed with a heated garage, essential to doing more than grousing about the weather in upstate NY at this time of year. So, I thought I'd share this weekend's project, in case others find it useful.
How to make a self-bailing wagon:
1. Remove the port and starboard quarter panel covers, spare tire, jack, and lug wrench (arrrgh! driver and passenger side, respectively, for landlubbers).
2. Is there any water present? If yes, note any signs of tracks from source, mop it up and proceed.
3. There are drains on both sides of the car, but they are often compromised.
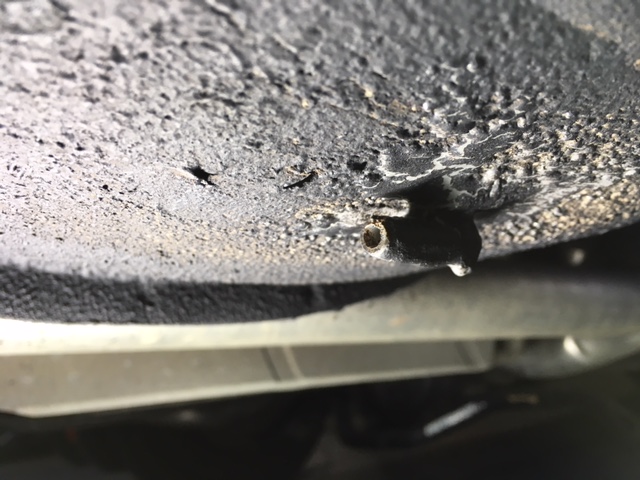
4. The drain on the starboard side is at the bottom center of the spare tire well. If it looks like a drilled hole and nothing more, you are missing a part. Don't bother junkyarding for a replacement: all you'll find is a 20-yr-old hard rubber turd, and it's not worth buying a new replacement part, even if you could find one.
5. Unless you have a lift, this part is done on your back. The portside drain is about 9 1/4" to the rear of the bottom rear edge of the wheel opening, on top of the lip of the lower edge of the body panel. The opening is roughly rectangular in outline. If the car has any aftermarket undercoating, this is likely gummed up, but it is there (thanks to Silverfox for the precise location and tool advice).
6. Put on eye protection for this part: A small cablelock tie is a good tool to clean this drain. Aerosol brake cleaner is also pretty good for addressing the gunk in there. Did I mention eye protection?
7. Found both drains and now they are open? Proceed. You'll want both wells squeaky clean and dry for the next part. Fold down the rear seat. Have a small flashlight and possibly an agile friend available. Go to your local LaserWash... one of those "touchless" places that has water pressure and volume that can remove pinstriping. This is not a job for the average garden hose. You will need to be in the back of the car during the wash, so if you can't crawl back there from the drivers seat in less than 60 seconds, put the friend back there, or load yourself back there with flashlight in hand, and let them drive the car into the wash.
8. Watch for leaks. Be patient...it sometimes takes a minute for the water to find its course. Stay put for the "blow-dry" cycle. The air pressure is intense and can reveal tiny leaks. Water dripping out of the rear grab handles? The seal around the top of a rear side window may be compromised. Water trickling from seam near taillights? The seam sealer is cracked. Water from elsewhere? Likely leaking of 20 yr old rivnuts on the roof rack. Some water is no big deal. It just needs to get out fast. There are many other ways to do this step, but this works really well, and you get a clean car to boot. Proceed.
9. Clean and remove all dirt, sand, flaked paint, donuts, dead bugs, etc from the interior wells. Leave ANY crud back here and you'll waste your time because it will wash into those tiny drains and plug them. Use a metal-adhering 100% silicone caulk to seal any cracked seam sealer.

10. Apply a rust converter (Rustoleum brush-on is good) and then a good rust preventive paint (brush or spray, your call) to the bottom of the wells. You'll want a clean smooth path for water to follow. It will also be easier to keep clean in the future.

11. Here's the trick to self-bailing: Ideally you need some kind of a downward sloping and rear facing aperture. Surface tension of water can be obstacle to it entering a small opening. It doesn't take much to overcome it, but it takes either "head" from depth of water in the bilge, forward motion, a lower pressure outside the car, or a combination of all three.
12. A small plastic barbed 1/2" ID Tygon Tubing elbow makes a good drain for the spare tire well. It can be epoxied in place, and reinforced from the outside with JB Quickweld. Inside, make sure the aperture is flush with the bottom of the well.

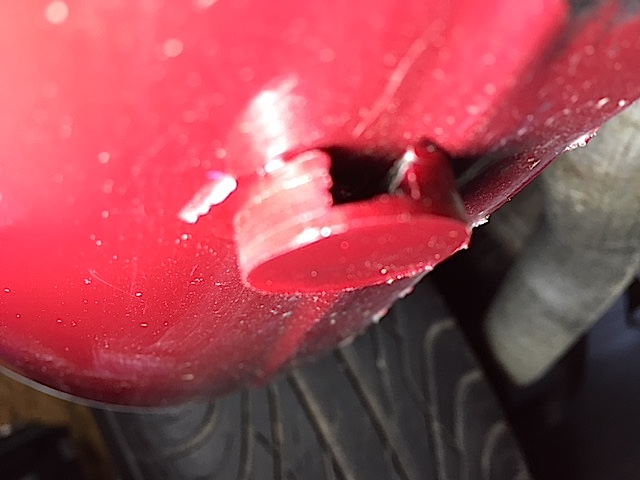
13. For the passenger side, I made a second drain. That little rectangular bugger does not impress me. I drilled a 3/16" hole at the very bottom of the well. I then stacked four nylon washers. On three of the washers, I clipped out a 1/4" section, bonded them together with epoxy, and plugged the top with JB Quickweld. Sanded and painted, it matches the body. Clean the exterior area around the new drain and attach with epoxy. It's not visible unless you are down there looking for it. You could just drill a hole to the outside, but you'll get crud splashing up into the well, and that might plug the drains on the way out again. This is more a little more work up front, but less later.

I've done this trick on my last three "boats". It works. Water in, water out.
Periodically check the drains to make sure they are open.
