| | Made some changes |  |
|
+20Big Wagon Guy 200OZ Gastt Sprocket SWT SS sherlock9c1 mtrhead79 MarcinV8 toomanytoyz phantom 309 1993 Roady-man Nick Danger brokecello 81X11 ModernMuscleHead BigBlackBeaSSt Cadet57 silverfox103 lornejay1 JaySS 24 posters |
|
| Author | Message |
|---|
JaySS
Admin

Posts : 428
Join date : 2009-01-06
| |
| | |
lornejay1
Posts : 850
Join date : 2008-11-05
Age : 62
| Subject: Re: Made some changes  Sat Apr 30, 2011 1:32 pm Sat Apr 30, 2011 1:32 pm | |
|
Jason I really like it,thanks for sharing.
Lorne.
| |
|
| | |
Guest
Guest
| | Subject: Re: Made some changes Sat Apr 30, 2011 1:39 pm | |
| Jason that is beautiful and classy looking as anything that I have seen done to our wagons.
Keep the pics coming please.
Jim Gordon |
|
| | |
silverfox103
Moderator

Posts : 3344
Join date : 2008-11-05
Age : 75
Location : Littleton, NH & St. Simons, GA
| | Subject: Re: Made some changes Sat Apr 30, 2011 2:14 pm | |
| Like the look Jason! Did you finally get a new tailgate?
Tom | |
|
| | |
Guest
Guest
| | Subject: Re: Made some changes Sat Apr 30, 2011 5:43 pm | |
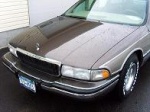
| Jason tell us about that beautiful darn hood.I wanted a reverse facing cowl induction hood but
you may have changed my mind.Very nice and easy to follow the linesbetween the scoop
openings.Was it very costly?
Jim Gordon |
|
| | |
Cadet57

Posts : 3047
Join date : 2010-04-13
Age : 36
Location : Chicopee, MA
| | Subject: Re: Made some changes Sat Apr 30, 2011 7:17 pm | |
| Thats cool. Very subtle. I like it. | |
|
| | |
JaySS
Admin
Posts : 428
Join date : 2009-01-06
| | Subject: Re: Made some changes Sat Apr 30, 2011 7:18 pm | |
| - silverfox103 wrote:
- Did you finally get a new tailgate?
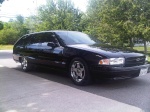
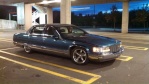
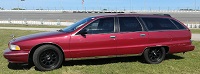
Tom Thank you to everyone for the compliments - I was hoping that people would like it. Yes in fact, I did get a tailgate (white & wood no less) and the roll pan has been repaired and painted:   Just got the pan on this afternoon. Got the tailgate where it should be, still fine tuning the backlight and hood latch adjustments. Also still need to rework the grill mating surface to have it fit the hood better at the top. The hood is made by Suncoast, I think they are about $700.00 new. I didn't buy it as I worked out a deal to build a custom center console insert for a 6-speed Impala (with integrated Bonneville seat controls) for it. It is a well built piece - this one survived blowing off a car at the top of second gear, flew over the roof and landed upside down before sliding like 150 ft down the road. The top was pretty scratched up and a rear corner broke off, but it was strong enough that it was easily repaired. The underside has provisions for a Ram Air system, but I'm not planning to make use of it. Here's a couple more pics so you can see how it works.   Thanks again, - J | |
|
| | |
BigBlackBeaSSt

Posts : 4560
Join date : 2009-08-01
Age : 58
Location : Sanford, NC
| | Subject: Re: Made some changes Sat Apr 30, 2011 8:54 pm | |
| Boy that is sharp. I LIKE IT!!!!!! | |
|
| | |
Guest
Guest
| | Subject: Re: Made some changes Sat Apr 30, 2011 10:09 pm | |
| Well you know its a well built hood to stand that kind of abuse.You would never know it was a
glider in a past life.
More Pics
Jim Gordon |
|
| | |
ModernMuscleHead

Posts : 71
Join date : 2011-03-15
Age : 53
Location : Michigan
| | Subject: Re: Made some changes Sat Apr 30, 2011 10:27 pm | |
| | |
|
| | |
81X11
Posts : 9876
Join date : 2010-06-23
Age : 49
Location : Round Rock Texas
| | Subject: Re: Made some changes Sat Apr 30, 2011 11:59 pm | |
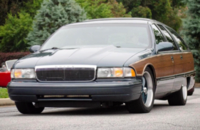
| That's really sharp! What did you get the Buick letters off for the grill?
It really looks good!
-Mike | |
|
| | |
brokecello
Moderator
Posts : 3478
Join date : 2009-05-28
Age : 45
Location : Greenville, SC
| | Subject: Re: Made some changes Sun May 01, 2011 12:10 am | |
| Looks amazing! Where did your centercaps come from? That is a nice touch  Chris | |
|
| | |
JaySS
Admin
Posts : 428
Join date : 2009-01-06
| | Subject: Re: Made some changes Sun May 01, 2011 10:31 am | |
| - Flasheroo wrote:
- Well you know its a well built hood to stand that kind of abuse.You would never know it was a
glider in a past life.
More Pics
Jim Gordon What would you like to see more pics of? - 81X11 wrote:
- That's really sharp! What did you get the Buick letters off for the grill?
It really looks good!
-Mike The letters are the ones that are used in the rear bumper of the mid 90's Regals. Pat was the first to use them, you may see them in some pics has posted in the past. These stand out more because the shell is color-matched. - brokecello wrote:
- Looks amazing! Where did your centercaps come from? That is a nice touch
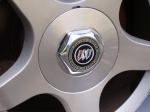
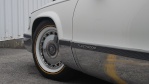
Chris The caps are cut out of the centers of Pontiac Vibe hubcaps:  I used these to get the countersunk shape and add a more cantilvered effect to the spokes.  The caps were cut down and are attached by using the lugnut covers as was done on the Vibe, Since they are 5 on 100mm and the Impala wheel is 5 on 5", there are threaded posts added inside the cap area that allow the covers to hold the center on. The Impala wheel was refinished and the entire center portion was painted silver to blend everything together. I had them on at first with the black Vibe lugnut covers, but later switched to chromed Silverado covers to brighten the center area up a bit. Thanks again for the positive feedback. - J | |
|
| | |
Nick Danger

Posts : 727
Join date : 2010-03-27
Location : Albuquerque
| | Subject: Re: Made some changes Sun May 01, 2011 11:35 am | |
| Wow, you do some good work. I like the hood, and I like the wheel caps. Are those Bill Harper's rear disk brakes? | |
|
| | |
JaySS
Admin
Posts : 428
Join date : 2009-01-06
| | Subject: Re: Made some changes Sun May 01, 2011 3:07 pm | |
| - Nick Danger wrote:
- Wow, you do some good work. I like the hood, and I like the wheel caps. Are those Bill Harper's rear disk brakes?
Kind of, the rear discs are a modification of Bill's WRDC setup. When it came time to do the conversion, I had enough to do without reinventing the wheel, so to speak. I purchased his backing plates, flange spacers and oversize C-clips as it didn't make sense to make up parts that were already available. Here's a link that discusses them in more detail: Mercedes Brake ConversionEnjoy... - J | |
|
| | |
Nick Danger
Posts : 727
Join date : 2010-03-27
Location : Albuquerque
| | Subject: Re: Made some changes Sun May 01, 2011 3:52 pm | |
| I remember that thread now. Impressive. | |
|
| | |
1993 Roady-man
Posts : 2126
Join date : 2009-05-26
Age : 57
Location : Hogansburg, Ny 13655
| | Subject: Re: Made some changes Mon May 02, 2011 6:31 am | |
| | |
|
| | |
Guest
Guest
| | Subject: Re: Made some changes Mon May 02, 2011 3:01 pm | |
| Incredible detail on those center caps,very impressive work Jason.You need to reach around and give yourself a pat on the back.
Jim Gordon |
|
| | |
phantom 309

Posts : 5848
Join date : 2008-12-28
Age : 114
| | Subject: Re: Made some changes Mon May 02, 2011 10:44 pm | |
| - Flasheroo wrote:
- Incredible detail on those center caps,very impressive work Jason.You need to reach around and give yourself a pat on the back.
Jim Gordon he likes reach arounds,. | |
|
| | |
Guest
Guest
| | Subject: Re: Made some changes Tue May 03, 2011 11:16 am | |
| Jay I keep going back and looking at those center caps and nevermind the front end those caps are incredible.Please tell me you took some pictures of how you converted those caps from
5x100mm to 5x127mm and still managed to keep them look like they are factory made ? I can hear the jokes already and yes I am pretty easy to impress,thats why I like it hear.
Jim Gordon
|
|
| | |
toomanytoyz
Posts : 3233
Join date : 2008-11-04
Age : 47
Location : Sandown, NH USA
| | Subject: Re: Made some changes Tue May 03, 2011 12:48 pm | |
| Looks great, Jay! I love ram air hoods on white wagons! I love that car. | |
|
| | |
JaySS
Admin
Posts : 428
Join date : 2009-01-06
| | Subject: Re: Made some changes Wed May 04, 2011 1:19 pm | |
| - Flasheroo wrote:
- Jay I keep going back and looking at those center caps and nevermind the front end those caps are incredible. Please tell me you took some pictures of how you converted those caps from 5x100mm to 5x127mm and still managed to keep them look like they are factory made ?
Well I don't have any specific pics right now, but this will give you the idea: After cutting out the center portion to fit inside the Impala recess, the next question was how to mount them. Something was needed that would give the Vibe lugnut covers something to thread into.  After some digging around, the Vibe lugnut caps were found to be the same thread pitch as 3/4" NPT fitting. Wanting to use some thing light and non-corroding I settled on PEX tubing adapters.  The ones I used had a barb ID of about 8mm, just enough to fit a 5/16" fastener. I cut most of the barb off, saving the little ears you can just see next to the hex to prevent them from spinning if the retaining bolt should loosen, ensuring I could always remove the cap Then 5 propeller shaped pockets, each about 1/8" deep were milled into the wheel between the existing lugnut holes, in a 5 on 100mm pattern. The center of the pocket was drilled and tapped to 5/16"-18 and the caps are held to the wheel by stainless capscrews with a bit of anti-seize compound, as they have to come off the mount the tire. The Vibe cap just kissed the inner step of the Impala cap retaining surface, so while I had the wheels on the mill, I chamferred the inner edge to allow them to sit flush with the outer wheel surface. I did leave enough material to ensure that the factory caps would still snap on if the Vibe caps didn't end up looking as good they should. The inverted PEX adapters act like the Vibe lugnuts, allowing the lugnut covers to fasten the truncated hubcap to the Impala wheel. After everything was ready to go together, it was confirmed that the the center of the Vibe cap came in contact with the front wheel bearing dust cover, preventing them from snugging down properly, a 1/16" shim behind the wheel was all that was necessary to prevent interference. Garnish and serve... - J | |
|
| | |
Guest
Guest
| | Subject: Re: Made some changes Wed May 04, 2011 2:17 pm | |
| Jay that was a ton of work and a huge effort but I have to say it was worth because you will
NEVER see those caps on another B body.That is unless you decide to make a few more sets
for oh say other wagon nuts?HINT HINT.I am looking for another set of SS rims locally as we
speak.the results were definitely worth the effort.
Thank a Bunch Jay
Jim Gordon |
|
| | |
Guest
Guest
| | Subject: Re: Made some changes Sat May 07, 2011 12:38 pm | |
| Amazing looking wagon you got. I was thinking about that hood, now you made me really want it for my caprice. |
|
| | |
JaySS
Admin
Posts : 428
Join date : 2009-01-06
| | Subject: SStreetlights install Sat Jan 28, 2012 10:46 am | |
| Continuing with the modifications thread, an update on some in-process lighting upgrades. This is the pair Mike (DBeaSSt), had offered up for sale here after removing them from his ’92 OCC.  He was unhappy with them, and after they arrived, I could see why he had enough. They were pretty much unusable as-is. That was meant as no reflection on Mike as a seller, or how he takes care of his stuff, as it was quite apparent after looking them over that the engineering behind the product needed help. They simply weren’t built robustly enough to withstand the environment to which they are subjected in a car that gets more than occasional use. The lenses were yellowed and had small cracks starting around the outer edges, not to mention the micro-fractures and pitting in the front surface Most of Hella projector mounting sockets were either broken or ready to fall apart. As it was, two of the capsules were basically floating in the bezels with no ability to aim them. Clearly they required some repairs if they were going to be usable again.  Starting off, the lights were completely disassembled to evaluate what would be needed. Once everything was apart, the individual parts were cleaned & inspected. The main brackets and lighting capsules themselves were OK, but that was about it. The threads of the adjusting screws had corrosion buildup that prevented them from turning, and the broken mounting cups would all require replacement. After several false starts trying to acquire new adjusting screw assemblies, and one canceled order later, we were still stuck with a set of expensive lights and had no way to use them. In the meantime, to keep things moving, I began looking to add some of the features that this set wasn’t originally optioned with. A properly sized set of CCFL halo rings was located. The sstreetlights were initially available with LED marker lights located in the lower inboard corners, but later in production the option was dropped due to availability issues. This is why you occasionally see a pair fully equipped, but with blanked-out areas where the marker lights should be. With a set of halos operating as the DRL’s there seemed little point to adding another white marker light, as it would detract from the angel eyes look. So a set of amber LED lights were installed to add some fill in lighting to the areas not currently illuminated by the existing turn signals / parking lights. The lenses were in rough shape. Replacement pieces are non-existent, so it was going to be make-do with what was there, or nothing. The outsides were first wet-sanded with 1000 grit paper, then re-polished using compound & a Powerball attachment. This cleared up most of the road wear and reduced the yellow tint. The yellowing appears to be result of UV exposure, so it is something that will just had to be lived with. To address the cracking problems, solvent was brushed along the backside edge and allowed to wick into the cracks, hopefully reducing their tendency to spread. Then all of the mounting holes that relied on push fasteners were oversized to permit the use of removable retainers, in order to make future work easier and more importantly, less likely to break something while attempting remove them for disassembly. Several evenings of work later, the halo rings were installed, the amber markers had been integrated into to the bezels, and the lenses were looking far better. After some extensive online searching, a set of replacement mounting sockets was found. Ideally, the adjusting assemblies would have been swapped out for new replacements, but for the time being, they are functional after soaking, wire brushing and an application of dry-film lubricant. In past we’ve often followed the factory lead by duplicating the blacked out look of the Impala headlights using decals cut from black sign-making material. This time I decided to try something different and cut overlays out of some 3M simulated carbon-fiber sheeting.  Once everything was prepped, the headlights were ready for re-assembly. What was found is when using taking extra time to put them back together, some of the fit issues that were causing problems began to show up. Both bezels were hanging up on the park / turn signal lights, meaning that they never had fit properly. Some work enlarging the openings and fine-tuning the mounting location had the lights passing through the bezels as was intended. Here is one of the lights showing where they are at right now:  Testing the accessory lights to see how they look - parking lights on:  DRL’s illuminated:  Both:  The internal light wiring still needs sorting and the main harness has yet to be cleaned & inspected. A bit more work and then they will be ready for installation. - J | |
|
| | |
lornejay1
Posts : 850
Join date : 2008-11-05
Age : 62
| | Subject: Re: Made some changes Sat Jan 28, 2012 11:52 am | |
| great work as usual,nothing like a great pair of headlights.  | |
|
| | |
MarcinV8

Posts : 128
Join date : 2011-11-22
Age : 39
Location : Mikolow, Poland
| | Subject: Re: Made some changes Sun Jan 29, 2012 6:19 am | |
| I love these lights. Sadly they are illegal in poland  | |
|
| | |
mtrhead79

Posts : 1599
Join date : 2010-04-24
Age : 55
Location : phila. pa
| | Subject: Re: Made some changes Sun Jan 29, 2012 9:02 am | |
| car looks great jay nice work | |
|
| | |
sherlock9c1
Posts : 2373
Join date : 2009-05-28
Location : Huntsville, AL
| | Subject: Re: Made some changes Sun Jan 29, 2012 5:55 pm | |
| This is exactly why I have become much more hesitant to do things different than the factory when I work on my cars. | |
|
| | |
toomanytoyz
Posts : 3233
Join date : 2008-11-04
Age : 47
Location : Sandown, NH USA
| | Subject: Re: Made some changes Sun Jan 29, 2012 6:30 pm | |
| - MarcinV8 wrote:
- I love these lights. Sadly they are illegal in poland
And out of production... How are they illegal? And nice work on them, Jay! Came out great! Sorry for the thread-jack.  | |
|
| | |
Guest
Guest
| | Subject: Re: Made some changes Sun Jan 29, 2012 7:17 pm | |
| Very impressive Jay!Bet Mike wishes that he had kept the lights and just sent them to Jay for
some magic.Going back over the pics of Jays wagon,I just noticed the backup alarm sensors in
the rollpan.Guessing thats what they are and knowing how difficult it is to see back there ,they
make perfect sense.I have a set but just need to install them.
Jim |
|
| | |
SWT SS

Posts : 72
Join date : 2009-03-23
| | Subject: Re: Made some changes Sun Jan 29, 2012 8:13 pm | |
| Jay not quite sure those light are legal in MA. I think you should let me take them off your hands before 5-0 pulls you over. Here in CT they would be well taken care of. And I feel you should have put a little more effort in them they still have some yellowing so before you through them out let me see what they look like on my wagon.. CP | |
|
| | |
phantom 309
Posts : 5848
Join date : 2008-12-28
Age : 114
| | Subject: Re: Made some changes Sun Jan 29, 2012 8:55 pm | |
| For testing purposes,. the headlights can be shipped up here to GV, the dark long roads will be a perfect enviroment for non biased testing,.
Nick | |
|
| | |
Sprocket
Posts : 6127
Join date : 2008-11-04
Location : Palm Beach County
| | Subject: Re: Made some changes Sun Jan 29, 2012 9:36 pm | |
| ^^^ too cold, the plastic may crack, I propose extensive UV testing in tropical climes....  | |
|
| | |
1993 Roady-man
Posts : 2126
Join date : 2009-05-26
Age : 57
Location : Hogansburg, Ny 13655
| | Subject: Re: Made some changes Sun Feb 12, 2012 6:16 am | |
| Looks good and by chance did you clearcoat the lenses?
| |
|
| | |
JaySS
Admin
Posts : 428
Join date : 2009-01-06
| | Subject: Re: Made some changes Sun Jun 23, 2013 9:31 pm | |
| Finally got back on these. I had been procrastinating because I knew how much effort it was going to be to get them right, After about 12 hours of grinding, filing and endless test fitting, the mechanicals are about done, The electrics are roughed in, still need to tweak the LH marker position, splice in the halos and finalize the wire routing.    High beams:  - J | |
|
| | |
Gastt
Posts : 525
Join date : 2010-07-30
Age : 36
Location : Treasure Coast, FL
| | Subject: Re: Made some changes Sun Jun 23, 2013 9:46 pm | |
| The hood and grill look nice Jay. Love the lights. Mine need some work too. They were in an accident before I got them and the wiring needs to be fixed a bit,.. huge improvement over stock. | |
|
| | |
Gastt
Posts : 525
Join date : 2010-07-30
Age : 36
Location : Treasure Coast, FL
| | Subject: Re: Made some changes Mon Jul 15, 2013 10:27 pm | |
| Jay, what did you use as replacements to hold the light capsules in place? Most of my mounting clips are cracked and I would like to replace all of them. Also, what did you use to seal the lenses to the assembly itself? | |
|
| | |
Guest
Guest
| | Subject: Re: Made some changes Mon Jul 15, 2013 11:54 pm | |
| Fitment looks as though the lights are a factory option.You do some incredible work no matter the material. |
|
| | |
JaySS
Admin
Posts : 428
Join date : 2009-01-06
| | Subject: Re: Made some changes Tue Jul 16, 2013 5:44 pm | |
| - Gastt wrote:
- Jay, what did you use as replacements to hold the light capsules in place? Most of my mounting clips are cracked and I would like to replace all of them. Also, what did you use to seal the lenses to the assembly itself?
Hi Tim, The Hella part number for the mounting screw assembly is 9XB 152 977 001 The Volvo part number is 2-107-111-6 I never did find a place that would actually process an order for them at the time, regardless of what they might have shown on their website, perhaps you will have better luck than I did. I didn’t try actually going to the Volvo dealer with the PN in hand. IIRC I found something similar on eBay that had the correct mounting clips and got those, then transferred the clips to the old posts. It was so long ago I don’t recall what the application or who the seller was, I just did searches for Hella or the European carmaker headlamp adjusters until I eventually found what was needed. The instructions say to seal the capsules with a thin bead of sealant – what looked like Black RTV when it came off. The recommended process was to install the lens after aiming the capsules was completed, then run a bead of sealer around the seam and perhaps smooth it with your finger. I plan to run tape around both sides of the junction so that once the RTV has flashed, the tape could be removed to create a clean edge, just haven’t got that far though. Hope this helps, - J | |
|
| | |
JaySS
Admin
Posts : 428
Join date : 2009-01-06
| | Subject: Re: Made some changes Sat Aug 03, 2013 6:38 pm | |
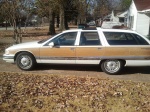
| The wagon tires were getting thin & i wasn't ready to drop the coin for a new set. Chris P. stepped up and offered to let me use his 18's. (Thanks Chris!) The new wheel spokes hit the calipers, so spacers were needed. Got a set ordered, but they weren't delivered in time for Wagonfest. Since they were intended for a Jeep, they needed the centers bored out to fit:  Mounted:  Front wheel back on:   Rear wheels needed 5/16" spacers to clear the calipers - valve stems were a concern, but they clear:  Back on all four:   Doug stopped by to check things out:  In other news, JP & I were talking about his wagon console @ WF - he may detect a similarity here:  Enjoy... - J | |
|
| | |
200OZ
Moderator

Posts : 1744
Join date : 2009-08-06
Age : 49
Location : Farmington NY.
| | Subject: Re: Made some changes Sat Aug 03, 2013 9:18 pm | |
| What about the intake? | |
|
| | |
silverfox103
Moderator
Posts : 3344
Join date : 2008-11-05
Age : 75
Location : Littleton, NH & St. Simons, GA
| | Subject: Re: Made some changes Sat Aug 03, 2013 9:29 pm | |
| What about the roof?  | |
|
| | |
lakeffect

Posts : 3892
Join date : 2009-08-18
Location : Rochester NY 14621
| | Subject: Re: Made some changes Sat Aug 03, 2013 10:01 pm | |
| What about Dorothy and Toto? | |
|
| | |
mtrhead79
Posts : 1599
Join date : 2010-04-24
Age : 55
Location : phila. pa
| | Subject: Re: Made some changes Sat Aug 03, 2013 10:59 pm | |
| these questions and more will be answered in our next exciting episode  it does look great Jay | |
|
| | |
Big Wagon Guy

Posts : 349
Join date : 2010-02-15
Location : Wasaga Beach Ontario
| | Subject: Love the pictures! Mon Aug 05, 2013 9:45 pm | |
| Rims look great...AMG brakes are awesome!!
Love the console...and really like the seats...are they Tan Recaros? Cant wait to see that car in person. Sir your very talented. Sure wish we lived a little closer, I bet playing cars with you is a lot of fun.
JP | |
|
| | |
GSBULLDOG
Posts : 313
Join date : 2010-12-24
Location : Memphis Tn
| | Subject: Re: Made some changes Mon Aug 05, 2013 10:06 pm | |
| AMG brakes are cool . Has there been a post about your brake set up ? I would like to know the in's and out's on your calipers . | |
|
| | |
JaySS
Admin
Posts : 428
Join date : 2009-01-06
| | Subject: Re: Made some changes Mon Aug 05, 2013 11:23 pm | |
| - Big Wagon Guy wrote:
- Rims look great...AMG brakes are awesome!! Love the console...and really like the seats...are they Tan Recaros?
Thought you would recognize the console Yes, they are Recaro seats are from a 9C6 (police) Lumina: http://canadianssps-b4cs.blogspot.com/2008/05/rcmp-lumina-with-recaro-seats.htmlFor those that aren't familar, they were a option over the basic police package, so not all 9C6's will have them.They were available in both beige (as shown in the link above) & blue.  Replacement upholstery pieces are almost nonexistent, so if you start looking for some, make sure that the fabric is in good condition. - Big Wagon Guy wrote:
- Cant wait to see that car in person. Sir your very talented. Sure wish we lived a little closer, I bet playing cars with you is a lot of fun.
JP Thanks for the kudos, though you may want to be careful what you wish for. Both Chris & Doug regularly comment (or complain) about the relative ease with which I seem to empty their wallets. Ask Doug about those $300.00 made-in-Japan-under-license-from-BBS centercaps sometime... At least my ideas usually work, or I'd already be beaten into a red mist with the pieces of a failed project.  - GSBULLDOG wrote:
- AMG brakes are cool. Has there been a post about your brake set up ? I would like to know the in's and out's on your calipers.
Not on here, but there is a link in Post #15 that will take you over to a small writeup over @ ISSF. If you have more questions afterwards, i can answer them here. - J | |
|
| | |
JaySS
Admin
Posts : 428
Join date : 2009-01-06
| | Subject: Re: Made some changes Sat Aug 10, 2013 10:05 pm | |
| - 200OZ wrote:
- What about the intake?
Mike enjoys pointing out that I have many cool underhood mods and yet I am still using a low-buck Home Depot intake:  Just for you Mike, I took the tube from the K&N FIPK and adapted it to the factory airbox. Shortened the K&N tube by about 4 inches and found an appropriately shaped elbow to bridge the tube & MAF:  As installed using an F body - 3-1/2" - MAF and a 1LE elbow:  I wasn't warming up to the new look, but I have always have liked the one that was used on the prototype Impala SS:  So I pulled some parts out of my stash & recreated it using a 3rd Gen TPI Firebird elbow and a black-wrinkle finished aluminum tube:  As installed:  Dorothy gave this one two thumds up, Toto merely nodded his approval. I'm going to leave this arrangement on the wagon, but don't worry, I'm won't be throwing out the first one. Since the Impala is still using the factory setup with a hockey puck, I'll be installing the K&N based setup on it, once I get the tune adjusted for the larger MAF. - J | |
|
| | |
toomanytoyz
Posts : 3233
Join date : 2008-11-04
Age : 47
Location : Sandown, NH USA
| | Subject: Re: Made some changes Sat Aug 10, 2013 10:47 pm | |
| Jay, that wagon is so badass. I love that it still has woodgrain on it!  | |
|
| | |
Sponsored content
| | Subject: Re: Made some changes | |
| |
|
| | |
| | Made some changes | |
|